.jpg)


#11 One Engine Inoperative Circuit, Approach and Landing
Aim:
To determine your ability to fly on one engine inoperative in the circuit, and during the approach and landing.
The Examiner will initiate this exercise on the downwind leg or prior to entering the circuit; it must be initiated at or above 500’ AGL when the aircraft speed is at or above the Vyse. Also, prior to landing, the Examiner is to specify the zone in which the touchdown is to be accomplished.
You will be expected to display the following flying characteristics:
- to use the procedures specified in the POH;
- fly an appropriate circuit that gives due regard to other traffic;
- fly the final approach leg in a manner that does not give rise to a low speed, high drag, high power combination;
- maintain the runway centreline;
- land in a predetermined touchdown zone.
Discussions
Consideration must be given to the requirements provided in the Seneca POH with respect to single-engine landings (p. 3-15):
SINGLE ENGINE LANDING
- Feather inoperative engine (see feathering procedure).
- Do not extend landing gear until certain of making field
- Do not lower wing flaps until certain of making field.
Maintain additional altitude and speed during approach, keeping in mind that landing should be made right the first time and that a go-around may require the use of full power on the operating engine, making control more difficult.
A final approach speed of 105 MPH and the use of 25° rather than full wing flaps will place the aircraft in the best configuration for a go-around should this be necessary, but it should be avoided if at all possible. Under some conditions of loading and density altitude a go-around may be impossible, and in any event the sudden application of power during single engine operation makes control of the aircraft more difficult.
Clearly, the manufacturer’s prescription of flying a single engine final approach at 105 MPH will not work in the short runway environment of Langley Airport—if we were to try such a fast approach, the risks associated with attempting to control an over-speed touchdown and roll-out would be far more dire than the risks associated with a engine-out landing. The requirements of Langley Airport are straightforward: we must cross the approach end of Langley’s runway and begin the landing flare at the prescribed minimum safe airspeed—90 MPH (with full or partial landing flaps). This raises the question as to whether Langley Airport should be used in an emergency. Simply stated, if the Seneca is loaded at maximum gross landing weight, and the density altitude is unfavourable, the ability to conduct a safe single-engine go-around is in doubt. By comparison, Abbotsford and Pitt Meadows—only a few minutes flying time away—have the distinct advantages associated with long runways where an approach and landing is less likely to go wrong. In selecting a suitable airport, additional consideration should also be given to the availability of CFR (Crash Fire Rescue) services.1 For the same reasons, however, Langley Airport provides an excellent training environment. We have to be precise on the single-engine approaches and landing owing to the tight parameters generated by the short runway surfaces. Also, we can conceive of circumstances in which an immediate emergency landing at Langley Airport becomes mandatory—an engine fire, for example.
The profile for a single-engine approach and landing has specific parameters that must be respected. The threshold must be crossed with the correct speed and flaps configuration. Also, the starting point for the approach sequence—specifically, the point at which the gear must be lowered and the initial flap extended to begin a stabilized approach—must be started at specific “gates” that are based primarily on the approach track selected by the pilot, as well as the initial altitude of the aircraft. Finally, the overriding principle governing the profile for light-twin single-engine approaches and landing—normalization.
The principle of normalization is simple that the pilot performs best during the approach and landing phase when procedures are normal. If we deviate from what is “normal,” then we place an inordinately higher level of demand on our sensory-gathering equipment. What we see with our eyes, and what we feel on the controls, guides our pilot response during any landing. If we allow a non-normal landing to develop and progress, we find ourselves in unfamiliar ground—what we see and what we feel becomes more difficult for us to mentally process and make sense of, effectively consuming the reserve mental space that we would otherwise dedicate to “judgement” and “awareness.” Conversely, if we keep things normal, we are better equipped to detect abnormal occurrences—such as may be presented by wind, weight, traffic, and performance variables. By performing a normal approach profile, we will be more effective in detecting deviations and making the necessary corrections—a continual process throughout any landing. If the normal procedure is to extend the landing gear when it is perceived that the aircraft has intercepted the normal glidepath, then this should be done—if only for the reason that we are not “used to” conducting a glidepath descent otherwise. The same applies to flap configurations and so forth. When an engine is shutdown, then, we should not deviate from our standard procedures, at least in so far as conformity with normal procedures does not present adverse circumstances.
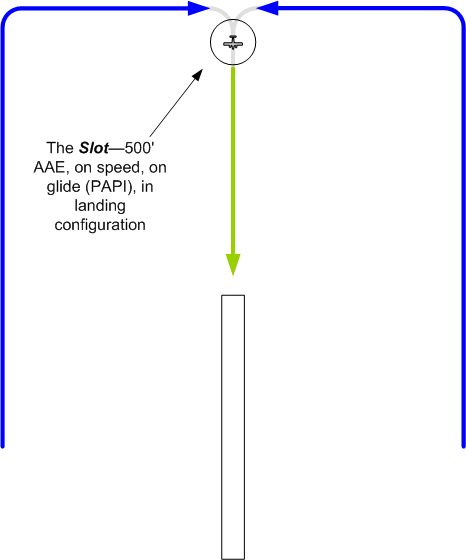
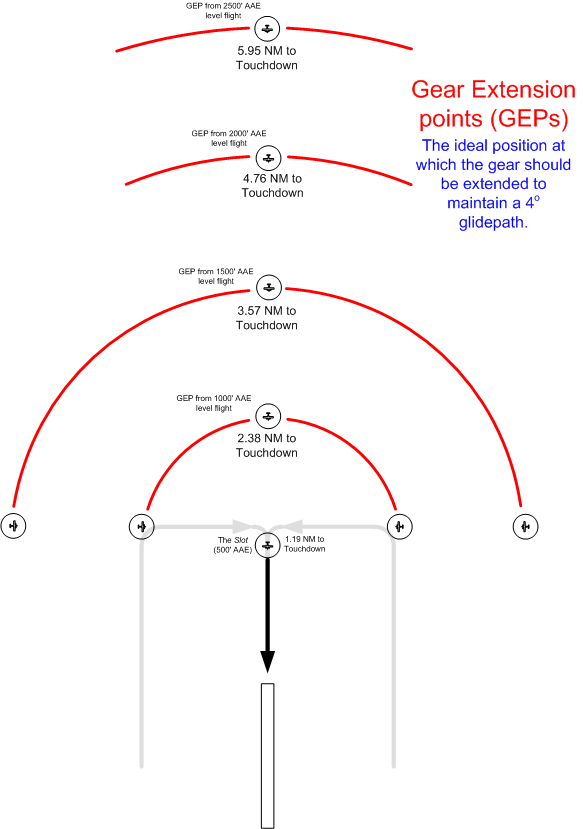
So what is the normal approach profile? Well, we know that before we initiate a descent for landing, we are normally in the “downwind configuration”—i.e., the flaps are set at 10°, and the airspeed is approximately 115 MPH. We also know that when the aircraft is in the correct position—the runway profile as viewed by the pilot is right—we begin the approach by extending the gear, setting the flaps to 25°, perhaps reducing the power by an “MP or so, and slowing the aircraft to 110 MPH. As we get to approximately the 500’ AAE point, we further reduced the airspeed to 90 MPH with 40° flaps—often a power change to reduce the airspeed is not required, as the increase in flap-drag does this for us. When all this is completed, it usually works out that we are generally in a good position at the bottom of the glide to make the landing—adjustments to the glide are always necessary, of course, as we nurse the throttles to increase or decrease the angle of glide (and the rate of descent). With sufficient practice, we are both familiar and comfortable with this process. Now, let us get a little bit technical—let us examine some things which are obvious, but still very important—especially when it comes to single-engine approaches. Consider, for example, the point at which we extend the gear to begin our descent during an approach—the gear-extension point, or GEP. When we fly repetitive circuits, GEP is always the point at which we leave the downwind leg and turn onto the base-leg. This is where we begin the glide for landing by extending the gear and follow the other familiar sequences—flaps, 10°, 25°, etc. We can also identify the point at which we turn from base to final—what some pilots call “slot.” The slot marks the beginning of short final. Once the slot is crossed, the aircraft should be all stabilized—on speed (Vref), with the landing flap set, and the rate of descent stabilized. No matter what type of approach we are doing—right base, straight in, circling, etc.—we always cross the slot on our way to touchdown. With respect to vertical position, the slot is fixed at approximately 500’ AAE, and generally lies approximately one miles off the runway threshold. The GEP, on the other hand, in addition to the normal downwind/base corner position, can exist at any position along an arch surrounding the approach end of the runway, but as a rule, they are located 1000’ AAE and just over miles from the threshold.
Here is the proposition, based on a normal approach profile, using the 4° glidepath (the orientation of the PAPI of Runway 19, for example), we can come up with standard positions at which the gear should be extend to begin a normal stabilized approach:
The context of all this is that it is crucial for success during a single-engine approach and landing that you are thinking in terms of height, distance, speed and aircraft configuration (flaps and gear) as you approach an airport for a single-engine landing. This is because single-engine landings are generally considered “one-shot” affairs—there may not be a second chance and you have to get it right the first time. The crucial element is planning ahead, and points, gates, and slots provide us with the language to think on these terms.
Here are some general guidelines for effective single-engine approaches:2
- To conduct a single-engine approach, begin by ensuring that all checklists are completed before you contact ATC for the approach clearance.
- Before you contact ATC for the approach clearance, ensure the aircraft is established in level flight in the downwind configuration (but with 0° Flaps). All that is required is for you to extend the gear and begin the final descent for landing. If you are not ready, stay clear of the control zone until your altitude and speed is on target. If you arrive at the call-up point without being properly organized and configured, turn the aircraft around in a gradual 360° turn and give yourself some time.
- Once you receive your clearance and continue inbound in stabilized level flight, all attention must be on the PAPI for an indication of glidepath intercept. If a PAPI is not available, look for the proper runway presentation associated with a normal descent for landing. When the PAPI come up with split colours, you are at the GEP. When this occurs, extend the gear, set flaps to 10°, and reduce speed to 105 MPH.
Throughout the approach, glideslope management is critical. The perfect single-engine approach is one where, having intercepted the glideslope at the correct speed, the gear is simply lower, the flaps are set to 10°, and the aircraft begins the perfect descent that ends at the runway threshold. Of course, that ain’t gonna happen. Some adjustments will always be required. The key to good single-engine glideslope flying is to recognize and correct deviations early, so that only a minimum change in power is required. The longer a deviation from the desired glideslope is left uncorrected, the greater the change in power required to change the momentum of the aircraft and affect the correction. Large power changes are the enemy here—a sudden surge or reduction in power will introduce complicating yaw forces, and both the power and yaw changes will lead to a destabilized flight path. Sometimes aggressive power changes will be required, but if this is necessary, smooth out destabilizing trends with smooth but aggressive control inputs.
There are other factors to keep in mind. Ensure the standard 5° bank into the good engine is maintained. While 25° has flaps has been applied at the slot, keep the 40°-flap extension in “your back pocket” until the landing is assured. If the approach appears too high, don’t be afraid to extend the remaining flap provided an acceptable descent rate is foreseen.
At the bottom of the single-engine glide, be sure to arrive with sufficient energy to complete the flare. As always, if you enter the last 50’ with 90 MPH, a normal flare will evolve.
Remember too that when the single throttle is closed, the aircraft will “normalize” and yaw will disappear—the one saving grace of single-engine approaches.
A complicating factor to simulated single-engine approaches is the fact that a “zero-thrust” setting on the bad-engine throttle and propeller actually tends to extend the glide. As well, note that you cannot land at Langley Airport with any residual throttle when the flare is initiated. At some point, the 10”MP used to simulate zero-thrust must be reduced to idle thrust. Importantly, you must determine when to do this, based on your approach profile. As a rule, it can be done anytime inside the slot. For good performance, however, you can use this small flexibility to your own advantage—if the glide appears on the low side, defer the closing of the bad-engine throttle, and if the glide appears high, close it early. But that is the extent of your options—a workable rule is that once the bad-engine throttle is closed, it cannot be reset again (to the zero-thrust position).
If the approach goes badly, recognize this as early as possible and initiate a single-engine overshoot. The Examiner will certainly mark you down, but you will not fail the exercise. Advance the good-throttle smoothly and slowly, being conscious to make pitch adjustments that won’t cause any loss of airspeed. After full throttle is achieved, flaps go to 25°, the gear is retracted, and the flaps are cleaned up. Then you fight for blue-line speed. The following appears on p. 3-15 of the POH:
SINGLE ENGINE GO-AROUND
If a single engine go-around cannot be avoided proceed as follows:
- Mixture—forward.
- Propeller—forward.
- Throttle—open.
- Flaps—retract.
- Landing Gear—retract.
- Airspeed—one engine inoperative best rate-of-climb speed 105 MPH.
- Trim—set.
- Cowl Flap—as required (operating engine).
Be sure to advise ATC that you are doing a “single-engine approach,” this will prepare them to provide you, if necessary, with flexibility concerning tracking and altitude during the approach—should a 360° turn become necessary, for example.
Just a final note on how this exercise is conducted during the flight test. It will, obviously, be the last exercise to complete. The simulation will likely be started by the Examiner as a means of getting you back to Langley Airport after all other exercises have been completed. There is a good chance that you will be at altitude—2500’ to 3500’—when the exercise begins, so anticipate the need for altitude-loss management prior to initiating communication with Langley Tower or the MF frequency.
Before you cross the point position, be sure that you have completed the Pre-landing Checklist. Also be sure to review the procedures for the Single-engine Overshoot.
Safety
We have sufficiently reviewed the risks and responses to Vmc.
On short final your instructor or Examiner will set the power quadrant for a possible go-around—setting the propeller to the full forward position. While this will be done, continue to use only the good engine throttle to negotiate final approach unless for any reason of safety you feel the use of both throttles is required. If your Instructor or the Examiner fails to reset the Propeller control, do this on your own accord.
Ensure the GUMP Checks are completed.
References:
1 CFR services are available at Vancouver and Victoria, but are not provided at the surrounding region general-aviation airports. At these smaller airports the ATC can arrange to have local non-aviation emergency services standing by.
2 I use the word “guidelines” rather than “rules” because you have to be extremely flexible in your thinking and planning during a single-engine approach.
3 Banking into the good engine of course.
4 The use of flaps, as well as the use of reduced airspeed, is only prescribed for Langley Airport. With longer runways, we must stick with the guidelines established for single-engine approaches in the Seneca’s POH—discussed below.
5 This assumes, of course, that you are advising ATC of your intentions—“Langley Tower . . we would like to do a 360 for spacing/altitude.”
6 The Seneca should not be slowed to 90 MPH with only 25° of flaps—see p. 7-10 of the POH.
7 A turn at this point would be viewed as a desperate measure, and the product of poor planning.
S