Preparatory Ground Instruction
The Template for Preparatory Ground Instruction
Preparatory Ground Instruction (PGI) is one-on-one instruction that occurs usually just prior to departure on a training flight where the student is learning a new exercise.
PGI serves the purpose of getting the student ready to fly the new exercise, so its primary focus is on “how” the exercise will be done.
Normally, then, the how PGI conveys to the student a sequence of actions related to the exercise and these actions are normally listed on the white board. As the Flight Instructor works down the list, the student is typically informed of what to expect and what to look for during the action sequence—this is the primary function of PGI.
Around the “how” component, the Instructor includes any background information that me be required to perform the exercise, and perhaps most important, factors related to safety in the performance of the exercise.
Here is the organizational template used in PGI:
- Definition
- Aim
- Motivation
- Background Knowledge
- How
- Safety
- Questions

Defintion
The definition simply defines the exercise that is to be flown. It is normally a technically definition and it should be derived form the Flight Training Manual.
The definition should be extracted from the student where possible as this will set the stage for an interactive presentation (maximizing student involvement), and this will allow the Flight Instructor to assess the student’s level of preparedness (threshold knowedge test).
It is good practice to summarize the definition (in short hand) on the white board.
Aim
The aim statement should set the targets for the exercise.
It should be short, to the point, and student focused (“Today you will learn . . .”)
A good source to obtain the aim of an exercise is the applicable flight test guide, which sets out the aim of each exercise as it applies in a flight test environment. This also set the stage for standards by which successful performance of the exercise will be measured.

Motivation
The motivation portion tells a student why it is important to learn today’s exercise, and why it is worth the $200 cost of its training.
This section should also motivate the Flight Instructor—a means of providing a reminder.
This is a good place to relay stories or experience.

Background Knowledge
The background knowledge section provides a space in the presentation where knowledge that is instrumental to performing an exercise (the “how” section) can be placed.
For basic stalls, for example, you may want to review the sequential symptoms of the stall and how these come about. For forced approaches, you might want to review causes; for precautionary landings or diversions, you might want to review conditions that would warrant their execution.
How
The how section is normally an “action sequence” section of the presentation and is the primary focus.
Where applicable, the how section should begin with student reference to the Pilot Operating Handbook (which should be pre-assigned).
This part may include sub-sequences (stall variations) or separate sequences (forced landing based engine failure versus engine fire).
Importantly, this section should focus on pilot actions and actions in the cockpit—“flying” the exercise.
Safety
Safety relates to safety in performing or practicing the exercise.
The student should be informed of the risks associated with the exercise, how to monitor them, and the actions to be taken in the event risk increases to an unacceptable level.
Questions
After the student has been asked is there are questions, the student should then be asked questions to confirm readiness to perform the exercise.
Preparatory Ground Instruction Notes
Attitudes and Movements
Definition, Aim, and Motivation
With respect to the definition of attitudes and movements, attitudes referred to the position of the aircraft relative to the horizon, while movements refer to the movement of the aircraft, generated by the pilot, around the axes of the aircraft. There are four attitudes and three movements.
The aim of lesson is to learn how to recognize the four attitudes, and how to produce and control the three movements to generate those attitudes.
This lesson is crucial as the student will learn the fundamental building blocks for which all flying rests.
Background Knowledge
The background knowledge begins with a review of the three movements, the axes around which the movement occurs, the pilot inputs used to generate the movements, and the aircraft control surface that produces the movement. This section of the PGI should be laid out in the form of a table on the whiteboard with the above items forming the headings of the columns in the table. The headings of the rows of the table, which appear on the left side or the three movements beginning with pitch, then roll, and then yaw as the heading for the bottom roll. Through interactive questions and answers with your student, complete the table together. Use a model aircraft to demonstrate the movements, as well as the control surfaces used to produce the movements. Hand the aircraft to the student and have the student demonstrate the movement and point out the control surface used to produce the movement.
There is an important ending to this list of movements, and you want to emphasize this with your student: the movements of pitch and roll are both produced and controlled by the pilot, however, the movement of yaw, in almost all instances, is controlled and not produce. YAW is considered yucky, and he will talk about this later.
How
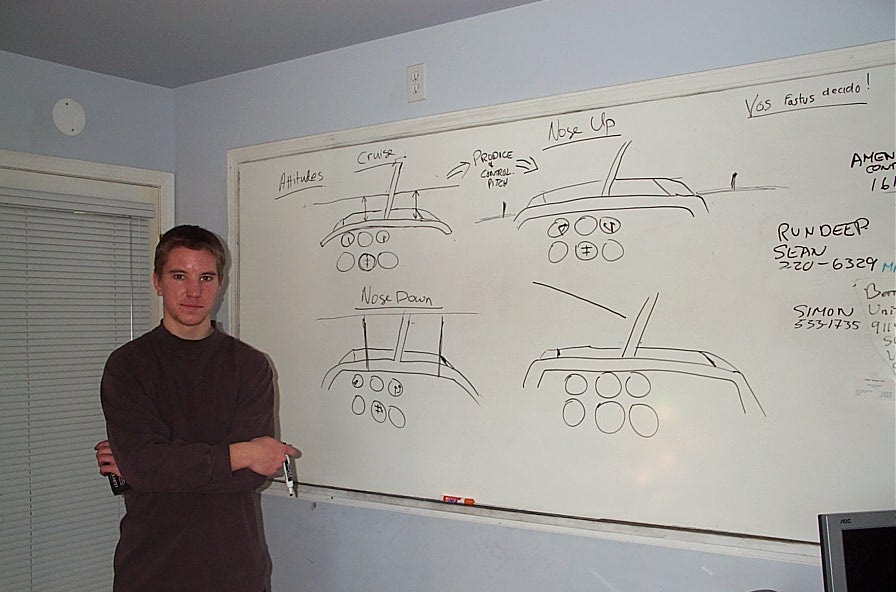
The how section focuses on attitude recognition, but includes the actions necessary to transition between the various attitudes. The plan is to draw for perspective drawings of what the student will see from the cockpit seat, looking forward through the windscreen. The primary features used to recognize the attitudes are the position of the glare shield, and the position of the horizon. Tell the student you want to begin by looking at the cruise attitude, as the cruise attitude is the most important in that it is the referent or reference attitude around which the other attitudes are defined. If you are comfortable with the procedure, actively draw the cruise attitude perspective with the student’s involvement. For example, draw a box on the left side of the whiteboard, and in the box, about three-quarters of the way down from the top, draw a horizontal line where the ends of the line curve downward. Ask the student if he knows what the line represents. Hopefully the student will say the line is glareshield. Of course, they have to use your imagination, and instructors are not the best artists, especially when it comes to perspective drawings. Point out, however, that the glareshield is not just the glareshield, but in fact represents to the pilot the visual reference for position of the aircraft's wings. Now draw a second horizontal line above the glareshield line, and again asked student if they know what the line represents. The lines of course the earth's horizon. Point out how, in the cruise attitude, these two lines are parallel, and that their separation is approximately 3 to 4 finger widths. Show the student what you mean by this. Show the student a little more detail in the diagram, drawing attention to what features they will see during flight in the cruise attitude. Begin perhaps with the instrument panel, drawing six circles on the left side of the panel. In front of the instrument display. Above the glareshield, but below the horizon, draw the engine Cowling of the aircraft as seen from the pilot's perspective. In the case of the Cherokee, this should include the left engine Cowling piano hinge, which is positioned directly above the control column shaft, directly above the heading indicator and the attitude indicator, and ultimately directly in front of the student’s nose. The hinge line is important as it represents the longitudinal axis of the aircraft, so that if you look down hinge line you will see exactly where the aircraft is pointed. Now mention the general features of the cruise attitude, noting that the aircraft is neither climbing nor descending, and that it is tracking straight. In the cruise attitude the airspeed is constant, and altitude is constant. Mention also to the student that if you look to the left and right wing tips, they will see that the space between the wind tips is constant and that the leading edge of the wing tip is slightly above the trailing edge of the wingtip.
Point out to the student that the real critical feature of this perspective is the horizon line and its recognition, which can be especially challenging in a mountainous environment. Take time to draw now a second horizon line, but one which transitions from flat landscape to a mountainous landscape. This is difficult to draw and requires practice. As the horizon line penetrates into the mountainous perspective, the horizon line is above the base of near mountains, but below the tops of distant mountains. As a rule, the horizon is the base of very distant mountains, which unfortunately are not always visible. The detection of the horizon line in a mountainous environment is complicated by the altitude of the aircraft. Explain that the student simply has to develop a sense of recognition, looking for key features such as the tree line, or the snow line.
Moved to your second box now, and draw the nose up attitude. Show how the glareshield and the horizon line remain parallel, but now coincide. In the nose up attitude, the airspeed is reduced but constant, the altimeter shows an increasing trend, yet the aircraft heading is constant. Looking at the wing tips, the space between the wingtips and the horizon reference remain constant and equal, yet the leading edge appears much higher relative to the horizon then the trailing edge.
Moved to your third box now and sketch the nose down attitude. Your presentation will parallel the presentation for the nose up attitude.
When the cruise attitude, the nose up attitude, and the nose down attitude, are completed, point out how the movement of pitch is used to generate these variations. Point out that it is not enough to simply pull back or push forward on the controls to generate the nose up and nose down attitude, but that the movement must be first produced with gentle forward or back pressure on the control column, and then controlled when the glareshield is correctly positioned relative to the horizon reference. This control of the movement is in fact a neutralization of pitching movement whereby the position of the glareshield is held constant. Emphasize the expression produce and control, as you will refer to this during the flight.
Now you are ready to advance to the bank attitudes. Draw the left bank attitude and then the right bank attitude, emphasizing that the distance between the horizon and the glareshield directly in line with the piano hinge of the Cowing remains constant, leaving the horizon line to angle above or below the glareshield reference, depending on whether the bank is to the left or to the right. This is of course difficult to describe using words, but easy to demonstrate with your perspective drawing. Your discussion of the bank attitudes will follow the format used for the nose up and nose down attitude, referring to speed altitude and turning trends, and pointing out that the left wing tip and right wing tip positions will be seemingly different relative to the horizon, with one being well below the horizon, and the other being well above horizon, etc.
When this is completed review how the movement of roll is used to generate bank attitudes, and that the concept of producing and controlling the movement applies equally. Your discussion of roll, and its application to the left bank and right bank attitudes should parallel your discussion earlier of pitch and its application to the nose up and nose down attitude.
You are now ready to move on to yaw. Point out that yaw is disrupted in nature in that it destabilizes the aircraft relative to the movement around the axes. Uncontrolled yaw leads to roll changes, which in turn leads to pitch changes. For this reason, your eyes yucky. Point out that the physical sensations of yaw is lateral movement in the pilot seat and that the physical sensations associated with this movement are the primary means by which pilots detect aircraft yaw. Point out the instrument indication of yaw, which is of course the ball portion of the turn coordinator. Just as the occupants are pushed left and right in the seat in response to yaw, the same occurs with the yaw ball.
Point out in general terms that there are three primary instances in which your must be controlled: during rolling movements, during nose up attitude, and during power changes. Review these with the student using your model aircraft, pointing out the corrective input for rudder during these instances.
Safety
After reviewing the PGI's basic features, move on to safety, and the safety discussions should relate the language that is used to pass control between instructor and student. The safety shouldn't include an emphasis on looking outside the aircraft for other aircraft in the vicinity. Review how the clock system is used to communicate the position of observed aircraft, including the concepts of high and low.
Present your review questions to the student.
.jpg)

