.jpg)


VOR Navigation
Air Instruction
Air instruction should begin at an altitude of 2000 feet to ensure you can track into the Pitt Meadows control zone without affecting circuit and transition traffic there.
When you begin, this air card, you should have ample space from the VOR transmitter in Pitt Meadows, and I would suggest somewhere in the vicinity of Hatzik Lake.
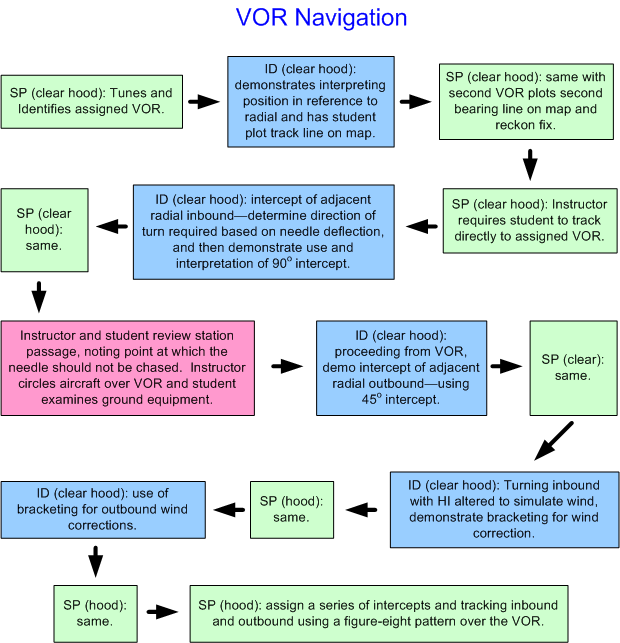
Position Identification
The air instruction for the VOR should begin with your request to the student to identify the aircraft's position relative to the Whatcom VOR. You should have control of the aircraft to start, and this will enable your student toconcentrate on manipulating the VOR set and display, and his chart, etc. Also, you start with the student not wearing the instrument hood (we call this clear hood—the student is earning instrument flying credit without actually wearing the hood) so that he can focus on the new tasks. Here is the lead-in language: "Let's move on to the VOR, Frankie, and I want to begin with you identifying position relative to the VOR." Then by way of a focus question: "Do you remember, Frankie, the sequence of actions that we first complete before using the VOR?" Monitor your student's actions carefully and ensure they visually confirm the frequency and Morse code using their navigation chart.
Once your student gets the needle centered with a TO indication on the OBI, review how you interpret the display in elementary terms: “Okay Frankie, if I am to interpret that, I will say ‘to fly directly to the Whatcom VOR, fly a heading of 075°’”. You should then ask your student to identify, again, in elementary terms, whether the aircraft is North, South, East, or West of the VOR. "What does this mean with respect to our position, Frankie? Are with North, South, East, or West of the VOR?" Once your student demonstrates this basic spacial awareness, you’re ready to give him the bonus question: “Well done, Frankie, now, what radial are we currently flying on?” It is very important here not to create the notion in your student’s mind that you expect them to understand at this stage in the training the concept of a radial—convey to you student that they will learn the concept with practice. Nevertheless, during this training flight, you now want to coach your student through drawing a line on their navigation chart showing the radial on which the aircraft is currently located—remember, this can be communicated to your student as a “track TO". "Okay Frankie, if we are on the 075° track to the VOR, can you draw this line on your map?"
Now you should let the student repeat the exercise using a different VOR-typically, the Meadows VOR. (If you use the Pitt Meadows VOR as the second transmitter that you work, you won't have to waste time switching back to the first transmitter—something that will save you some precious air time.) Repeat your quesitoning of the student with the second VOR displayed. After the student has drawn the second track line relative to the second VOR transmitter, have them identify their approximate position on their chart using the fix derived from the crossed lines that the student has now drawn. When this is done, ask your student to proceed directly to the second VOR transmitter.
Needle Movement
Once the student has established the aircraft on a track directly to the transmitter, take control the aircraft and tell your student that you want to now demonstrate the needle behavior when the aircraft drifts off track. Begin a series of maneuvers that could be destribed as large S-turns, the first in one direction, and the second in the opposite direction, establishing a perpendicular course that will produce needle movement and off-course indications on the OBI. Essentially, you turn away from the course 90° and show the needle migrate off-center, and then you turn back towards the course, again 90°, to show the needle migrating back to the on-course indication. Be sure your student can interpret the the degrees indicated on the display, and also ensure they understand the markings on the scale. Also, when re-intercepting the course, demonstrate how you can soften the intercept to a 45° angle so as to make the needle move slower and therefore succesful interception easier. Show how you can rollout back on course accurately, with the needle centered. Now you simply repeat this drill with the student flying, having them re-intercept the original course selected. This too should be done as clear-hood.
Tracking to the VOR and the Flyover
If you have ample room from the VOR transmitter, you can proceed with intercepting an adjacient track. If you are too close to the transmitter (more likely the case), and time does not permit and intercept, proceed directly with the overfly of the transmitter site. Enroute to the overfly, which should now be done with the student wearing the hood, have the student practice tracking directly to the transmitter, maintaining a needle-centered indication as long as possible. They should be shown the no-signal zone and the flip from TO to FROM as the indicator of station passage. After station passage has occurred, you should take control of the airplane, have the student remove their hood, and begin flying a steep turn that will permit the student to identify visually the transmitter below. The flyover is complicated by the fact that you must prearrange a clearance from the Pitt Meadows tower, if in fact you are using this transmitter. Using the Whatcom transmitter has its own complications related to US airspace, etc.
Inbound Intercept Procedures
In moving onto intercepts, you must silently identify to yourself an adjacent radial that is not too close, but not too far from the aircraft's present position. Generally speaking, if you are within 10 miles of the transmitter, you should pick a radial that is not less than 30° from your current radial, and if you are more than 10 miles from the transmitter, you obviously have to decrease that distance to, for example, just beyond 10°—i.e., you pick a target radial that is just beyond full-needle deflection, but close enought so that as soon as you turn to intercept, the needle will come alive. Take control of the aircraft and begin intercepts by posing the problem to your student as follows: "Okay Frankie, now let's presume we want to intercept the 270° track TO the VOR . ." Notice that I am not using the word radial here—remember, the concept of a radial is a source of brain damage for private pilot students; let them master interpreting the OBI using TO and FROM track concepts first. When interpreting and intercept using an offset needle, communicate that you select the intercept track on the side of the azimuth display to which the needle is deflected. When the intercept is completed, pass control to the student and have them perform a second intercept if there is time. If the distances permit, use 90° intercepts so as to conserve your distance to the transmitter. Once you arrive at the transmitter you have to proceed with the flyover drill and demonstration.
If circumstances do not permit the initial intercept training en route to the VOR, simply have the student take control of the aircraft and continue tracking to the transmitter for the overfly. Then, after you complete circling the transmitter (to show the student the transmitter), instructor your student to fly a specific heading that will enable the aircraft to fly directly from the transmitter—this is to enable you to get some distance from the transmitter, and I would suggest not less than 5 NM. From this position, begin with the inbound intercepts, which you can actually be initated while traveling away from the transmitter. Remember, you want sufficient space in all cases that will permit to back-to-back intercepts, the first which you demonstrate to the student, with the students help (clear hood), and the second conducted by the student as practice (hood).
Outbound Intercept Procedures
Once the student has learned how to intercept tracks to the VOR, you are ready to proceed with intercepting tracks FROM the VOR. While some instructors may argue that there is little difference between two and from intercepts and that the sequence of training is not therefore important, I believe it's easier for your students to learn tracks to first then progressing to tracks from. In all cases, instructors have to have flexibility to adjust to the circumstances that present themselves during training flights, especially distances to the transmitter's, etc.
Once the student has learned how to intercept tracks to and from the VOR, you are ready to incorporate the concept of radials as part of your assignment to the student. It is also an excellent exercise to perform a series of figure-8 tracking assignments over the VOR, in which you are repetitively alternate between track TO and track FROM intercept assignments, typically with 30° spacings. With the figure-8 pattern, the student will learn to master negotiating the aircraft while tracking straight lines directly over the transmitter. This should, of course, be conducted with the student under the hood.