CIRCUIT TRAINING—TAKEOFFS, THE CIRCUIT, AND LANDINGS
- CIRCUIT TRAINING—TAKEOFFS, THE CIRCUIT, AND LANDINGS
- APPROACH AND LANDING
- Aim
- Description
- Performance Criteria—Normal Approach and Landing
- Performance Criteria—Soft-field Approach and Landing
- Performance Criteria—Short-field Approach and Landing
- Performance Criteria—Power-off 180° Accuracy Approach and Landing (Commercial Pilot Students)
- Performance Criteria—Overshoot
- Approach
- The 500’ Rule
- The Flare and Landing
- The Roll-Out
- The Touch and Go
- The 50% Rule
- Overshoot
- Simulated Forced Approaches in the Circuit
- Variations for Crosswind Landings
- Further Reading
- Short-field Landings
- Obstacle Landings
- Soft-field Landings
- Power-off 180° Accuracy Approach
- Flight Safety for Circuit Training (link)
- References
APPROACH AND LANDING
Aim
Students must demonstrate the ability to approach and land safely using the correct procedures and technique for the actual wind conditions, runway surface and length (or those specified by the Examiner), and to assess the possibility of such further conditions as wind sheer and wake turbulence, and to execute overshoot procedures.
Description
You will be required to demonstrate two landings and an overshoot. One of the landings will be a normal landing, and the other will be either a short-field or soft-field landing. Where it is practicable, at least one of the landings will be based on a previously calculated performance, and, if possible, at least one of the landings shall be completed under crosswind conditions.
The simulated surface conditions, the obstacles on approach, the runway threshold position, and the length of the surface available for the soft-field or short-field landing will be, where necessary, specified by the Examiner prior to commencing the exercise.
The overshoot may be called for and assessed by the Examiner from any of the landing approaches, the forced landing exercise, or the precautionary landing exercise.
Of special note, the student must be able to explain the operational necessity for any variations from recommended speeds—e.g., gusty or crosswind conditions.
Performance Criteria—Normal Approach and Landing
Private Pilot Students must:
- perform an effective passenger safety review;
- consider the wind conditions, landing surface and obstructions;
- select a specific touchdown point;
- establish the recommended approach and landing configuration;
- maintain a stabilized approach at the recommended airspeed, or in its absence, 1.3 Vso, (+10/-5 knots);
- maintain crosswind correction and directional control throughout the approach and landing;
- make smooth, timely and correct control applications during the approach and landing;
- touch down smoothly at a minimum speed for existing conditions, at the specified touch-down point (+400/-100 feet);
- touch down with no drift and with the aeroplane's longitudinal axis aligned with and within 15 feet of the centre of the landing surface;
- touch down in accordance with the POH/AFM or best accepted practice for the aeroplane type;
- apply brakes, as necessary, without excessive lockup or skidding;
- complete appropriate checks.
Commercial Pilot Students must:
Not Applicable.
Performance Criteria—Soft-field Approach and Landing
Private Pilot Students must:
- perform an effective passenger safety review;
- consider the wind conditions, obstructions and actual or simulated landing surface;
- select the most suitable touchdown zone;
- execute the initial approach using recommended airspeeds and configurations;
- fly a final approach profile that clears any actual or simulated obstacle, and results in the appropriate configuration and one of the following speeds at a height of 50 feet:
- the recommended final approach speed (+10/-5 knots); or
- 1.3 Vso (+10/-5 knots); or
- the minimum safe speed for existing conditions e.g. gusty or crosswind conditions.
- maintain crosswind correction and directional control throughout the approach and landing;
- touch down softly using power as necessary to achieve the landing attitude for the slowest possible touch down on the main wheels, while preventing nose wheel or tail cone contact with the ground;
- touch down in the first one third (1/3) of the runway, with no side drift and with the aeroplane’s longitudinal axis aligned with the landing surface;
- maintain the required nose-up control during the landing roll;
- complete appropriate checks.
Commercial Pilot Students must:
- perform an effective passenger safety review;
- consider the wind conditions, landing surface and obstructions;
- select the most suitable touchdown zone;
- execute the initial approach using recommended airspeeds and configurations;
- fly a final approach profile that clears any actual or simulated obstacle, and results in the appropriate configuration and one of the following speeds at a height of 50 feet:
- the recommended final approach speed, corrected for the actual landing weight in accordance with POH charts or tables (+10/-5 knots); or
- in the absence of charts or tables, 1.3 Vso corrected for the landing weight as determined in Ex. 2B1 (+10/-5 knots); or
- the minimum safe speed for existing conditions e.g. gusty or crosswind conditions.
- maintain crosswind correction and directional control throughout the approach and landing;
- touch down in the first one third (1/3) of the runway, with no side drift and with the aeroplane’s longitudinal axis aligned with and over the runway centreline/landing path;
- touch down softly using power as necessary to achieve the landing attitude for the slowest possible touch down on the main wheels, while preventing nose wheel or tail cone contact with the ground;
- maintain the required nose-up control during the landing roll;
- complete appropriate checks.
Performance Criteria—Short-field Approach and Landing
Private Pilot Students must:
- perform an effective passenger safety review;
- consider the wind conditions and actual or simulated landing surface and obstructions;
- select the most suitable touchdown zone and specify a touchdown point;
- execute the initial approach using recommended airspeeds and configurations;
- fly a final approach profile that clears any actual or simulated obstacle, and results in the appropriate configuration and one of the following speeds at a height of 50 feet:
- the recommended final approach speed (+10/-5 knots); or
- 1.3 Vso (+10/-5 knots); or
- the minimum safe speed for existing conditions e.g. gusty or crosswind conditions.
- maintain crosswind correction and directional control throughout the approach and landing;
- make smooth, timely and correct control applications during the landing flare and touchdown;
- touch down at the specified touchdown point (+200/-50 feet) in accordance with the POH/AFM or best accepted practice for the aeroplane type;
- touch down with no side drift, and with the longitudinal axis aligned with and within 15 feet of the centre of the landing surface;
- apply brakes, without excessive lockup or skidding and stop safely in the shortest distance;
- complete appropriate checks.
Commercial Pilots Students must:
- perform an effective passenger safety review;
- consider the wind conditions and actual or simulated landing surface and obstructions;
- specify a specific touchdown point;
- execute the initial approach using recommended airspeeds and configurations;
- fly a final approach profile that clears any actual or simulated obstacle, and results in the appropriate configuration and one of the following speeds at a height of 50 feet:
- the recommended final approach speed, corrected for the actual landing weight in accordance with POH charts or tables
(+10/-5 knots); or in the absence of charts or tables; - 1.3 Vso corrected for the landing weight as determined in Ex. 2B (+10/-5 knots); or
- the minimum safe speed for existing conditions e.g. gusty or crosswind conditions.
- the recommended final approach speed, corrected for the actual landing weight in accordance with POH charts or tables
- make smooth, timely and correct control application during the landing flare and touchdown;
- touch down at the specified touchdown point (+100/-50 feet) with no side drift, and with the longitudinal axis aligned with and over the runway centreline/landing path, in accordance with the POH/AFM or best accepted practice for the aeroplane type;
- maintain crosswind correction and directional control throughout the approach and landing;
- apply brakes, without excessive lockup or skidding, and stop safely in the shortest distance;
- complete appropriate checks.
Performance Criteria—Power-off 180° Accuracy Approach and Landing (Commercial Pilot Students)
The power-off 180° accuracy approach and landing is initiated from normal circuit height or at the height assigned by ATC. In this manoeuvre the student will be asked to close the throttle and initiate the power-off glide on the downwind leg abeam the specified touchdown point. In the event that traffic conflicts occur, the start of the approach may be delayed until later in the circuit. After closing the throttle, the student will be expected to perform a gliding approach from circuit height that results in an accurate touchdown and landing.
Commercial Pilot Students must:
- consider wind conditions, landing surface and obstacles;
- specify an appropriate touchdown point;
- close the throttle from normal circuit height;
- establish a gliding approach at the recommended speed
(+10/-5 knots); - complete cockpit checks;
- extend landing flap and lower landing gear, if retractable, when landing is assured;
- touch down in a normal landing attitude at the specified touchdown point (+400/-50 feet);
Note: One (1) engine clearing will be allowed before descending through 500 feet AGL. In very cold conditions, the use of some power and flaps while maintaining the same airspeed and a normal gliding rate of descent is acceptable.
Performance Criteria—Overshoot
Private Pilot Students must:
- respond upon command to overshoot or make a timely decision to discontinue the approach to landing;
- promptly and smoothly apply maximum allowable power and establish the pitch attitude that will stop the descent;
- retract flaps in stages or as recommended by the manufacturer;
- retract the landing gear (where applicable) after a positive rate of climb is established, or as recommended by the manufacturer;
- accelerate to and maintain the recommended climb speed
(+10/-5 knots); - maintain maximum allowable power to a safe manoeuvring altitude then, where applicable, set climb power;
- complete the appropriate checks.
Commercial Pilot Students must:
- make a timely decision to discontinue the approach to landing;
- promptly and smoothly apply maximum allowable power and establish the pitch attitude that will stop the descent;
- retract flaps in stages or as recommended by the manufacturer;
- retract the landing gear (where applicable) after a positive rate of climb is established, or as recommended by the manufacturer;
- accelerate to and maintain the recommended climb speed
(+10/-5 knots); - maintain maximum allowable power to a safe manoeuvring height then, where applicable, set climb power (±0.5” MP, ±50 RPM);
- complete the appropriate checks.
Approach
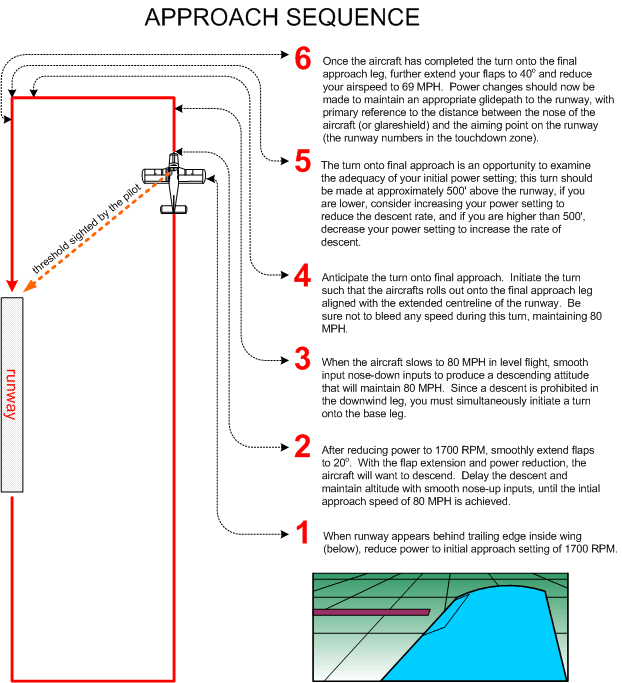
Good landings are contingent on good approaches, and the next phase of the approach—judging the turn onto final—is crucial. If the turn is incorrectly done, adjustments on centreline placement will take mental attention away from airspeed and glidepath management. Airspeed and glidepath adjustments are demanding enough without the addition of wrestling with centreline positioning. Plan ahead so that the turn onto the final leg is made with the use of a gentle bank, but by all means adjust your bank and rate of turn in order to roll out on the centreline. Remember that the steeper the turn, the more additional work will be required by the right hand as pitch changes will be required. Maintain 80 MPH until you roll out on final.

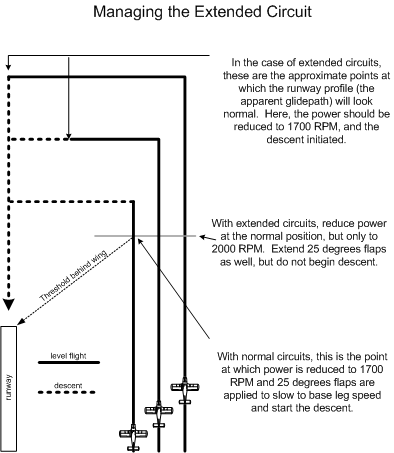
Success at landing is firmly rooted in your ability to develop a standardized approach pattern or profile. If you ensure that the approach is conducted the same way every time, then you will develop an ability to predict the outcome of the approach—it will become easy to make sense of the pitch, power, and flap changes insofar as their effect on the approach profile. Repetition and standardization is the key, then, and you want to develop this as soon as possible.2 Below, again, is the standardized approach applied by Langley Flying School Instructors. Note the detail in power settings, flap setting, and airspeeds. Note also the start of the approach—the approach sequence begins in the downwind leg when the runway threshold appears behind the trailing edge of the inside wing (usually the left wing in a left-hand circuit).
The 500’ Rule

The altimeter should be referenced with respect to the aircraft height above the airport elevation. As a rule, the aircraft should be descending through 500’ when the turn to final is made and any variation from this 500’ mark should be met with the appropriate power changes. This is especially important with night landings when visual reference to the ground below during final is not possible.
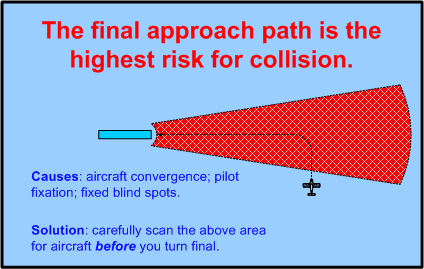
Before turning on to final, have a good look for other aircraft in your vicinity. The final leg statistically has the highest risk for mid-air collisions.
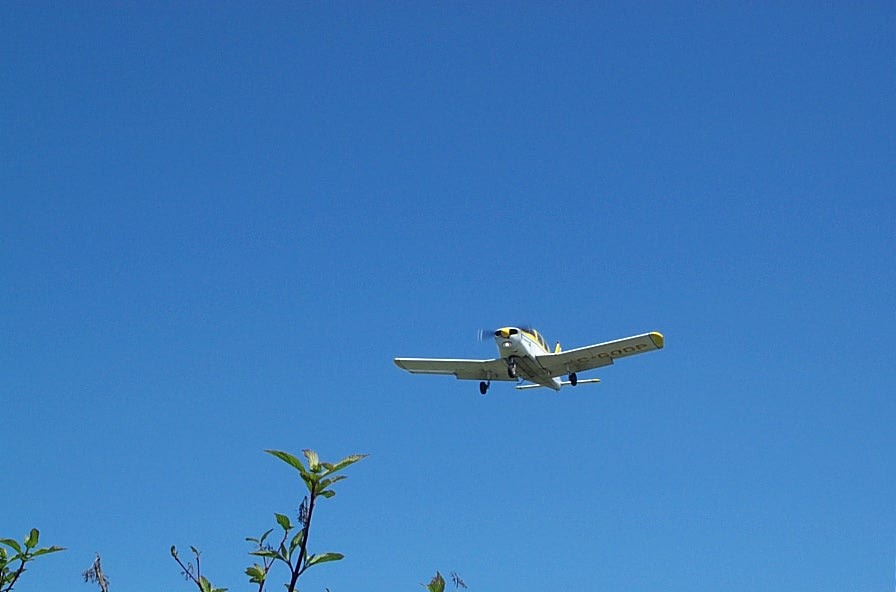
Because of the short runway at Langley, full flap should always be selected once the aircraft is established on final. If an approach is inordinately high, full flap should be selected on base, but 80 MPH should still be maintained on the base leg.
On the final approach, the aircraft manufacturer requires a normal approach speed of 69 MPH when 40° flaps are used. In conditions of gusting winds, this speed should be increased by one-half the gust value.
Speed control on final approach is pivotal to landing. The aircraft must arrive3 at the threshold with just the right amount of energy. Too fast, and the landing will be long, forcing the possible decision to conduct an overshoot; too slow, and the pilot will have diminished control, making smooth transition to the runway surface difficult.4 Many students believe, quite incorrectly, that the proper technique for speed control is to continually monitor or scan the airspeed indicator throughout the approach. If fact, this is not correct. The technique for speed control that should be used is to concentrate on angle of attack. Set the correct speed with reference to the airspeed indicator as soon as possible after the aircraft turns on to the final-approach leg. Then, when the speed has stabilized, note the distance between the glareshield and the target reference—the runway threshold. If you maintain the correct distance throughout the rest of the final-approach leg, the airspeed will not migrate from established speed.
During the final approach, in addition to airspeed control (pitch), you will have to also concentrate on maintaining pre-selected glidepath. Again, the 500’ AGL reference for the turn onto final approach from base leg is important here. Given normal circuit spacing, the aircraft should be at, or just slightly under, 500’ above the runway when the turn on to final is completed. Essentially, the runway profile that you observe here is correct and you should strive to keep this profile constant. If the runway appears to “flatten out,” you have descended below the initial glidepath. If the runway appears to become “steep,” then you have migrated above the correct glidepath. A pilot’s control with reference to the glidepath is, of course, power. In the case that the aircraft is below the glidepath, added power is required to climb vertically during the final approach, whereas the appearance of the aircraft above the glidepath requires a decrease in power.5 Changes in power settings will affect changes in airspeed, but the effect is only slight if power changes are accomplished sparingly—if you respond to vertical changes in the aircraft’s position early, then the power change required is minimal. If power is added (because the aircraft is below the desired glidepath), pitch-up slightly to maintain a constant speed, and if power is reduced (because the aircraft is above the desired glidepath), pitch forward slightly to maintain a constant speed.
What is the proper course of action if the circuit is abnormally long—as is the case, for example, if the tower controller requests this, or if traffic forces the extension of the downwind leg? If the circuit becomes abnormally long, defer the descent and approach sequence until the runway profile appears correct to you. As you turn on to the base leg, you can still reduce your airspeed to 80 MPH and extend 25° flaps, but instead of reducing power from the downwind power (approximately 2300 RPM) to the normal approach power (approximately 1700 RPM) when you turn base, reduce the power to only 2000 RPM. With the flaps extended to 25°, 2000 RPM will maintain level flight with an indicated airspeed of about 80 MPH. When the runway profile looks right, you simply reduce the power to 1700 RPM to initiate the descent.
On top of this you must make aileron inputs to maintain the centreline. If there is a crosswind on final, allow the aircraft to crab into the wind throughout the first half of the approach; this will allow you to assess the wind conditions. When you reach short final—approximately halfway between the turn onto final and the runway threshold—smoothly align the longitudinal axis of the aircraft with the extended runway centreline. As the longitudinal axis is swung parallel to the projected centreline, the ailerons must be properly deflected so as to produce a turn opposite to the rudder inputs (you are now configured in a “side slip”) with the goal being to maintain the aircraft positioned over the centreline. So, if you are off to the left of the centreline, you must respond with the ailerons by producing and controlling a right turn—the feet, however, must input more left rudder to prevent the longitudinal axis from swinging right. It is quite a lot of fun: Through any landing—crosswind or calm wind—the job of your feet is to keep the nose parallel with the centreline, the aileron inputs maintain the centreline, the pitch inputs continue to control the speed, and the power inputs continue to control glidepath. Owing to the fact that you are doing so much work (thank goodness it is only for a few seconds!), you will likely be quite tired after an hour of circuits!
The Flare and Landing
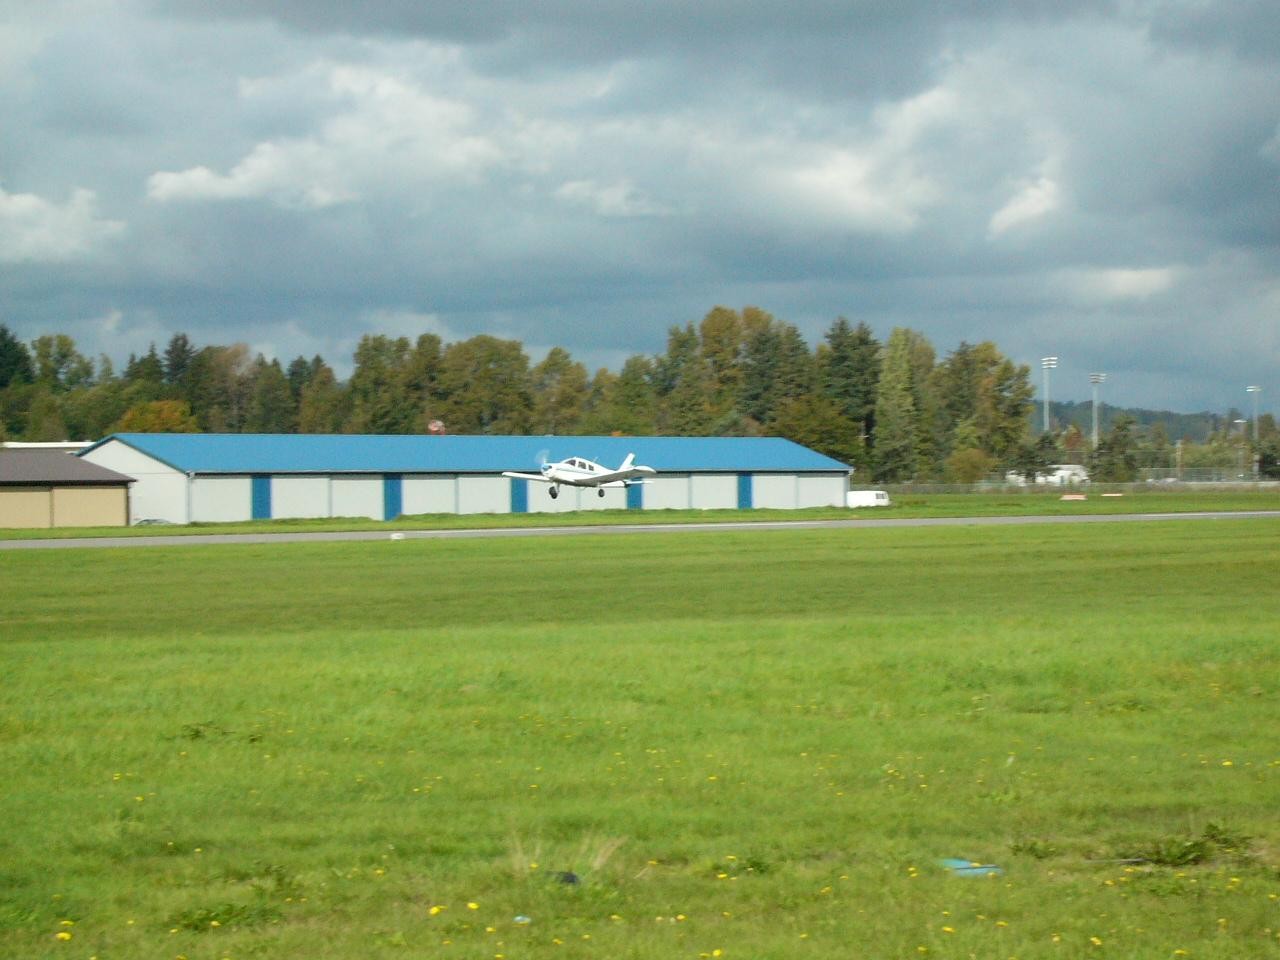
Flare judgement will come with time. There are, however, a few points to be made here. Remember that there is an invisible soft pillow above the runway called “ground effect.” In ground effect the aircraft acquires “super-lift” which ultimately makes prospect of landing easy—after you get the hang of it, anyway. Ground effect exists approximately one wingspan above the ground; it is most felt and is most effective, however, approximately one-half a wingspan above the ground. Enter into ground effect at the prescribed approach speed (69 MPH in non-gust conditions), but once you enter ground effect you can safely bleed off airspeed (ensuring the throttle is now closed). Think of your task as being to enter ground effect with the airspeed starting to bleed off and with the necessary pitch changes to begin levelling off the aircraft in the cruise attitude just above the runway. Then, as the aircraft slows and begins to descend despite the cruise attitude, begin to pitch-up the aircraft into a climb attitude. As your timing and judgement develop, you will establish the aircraft in the climb attitude just as the main gear touch down. At this point, do not move the stick forward—instead, concentrate on simply maintaining the climb attitude. Other control inputs—such as rudder and ailerons—remain the same as they were during the short-final phase.
The Roll-Out
Immediately after the nose gear settles, the flaps should be retracted in anticipation that maximum braking may be required. In non-crosswind landings, the control column should be held back so as to provide maximum aerodynamic braking. The ailerons should be held neutral and the rudder inputs should maintain the centreline with precision. In a crosswind landing, the nose gear is placed more aggressively on the runway and the pitch control inputs are neutral; importantly, however, the ailerons are adjusted to input a turn into the crosswind with ever-increasing aileron as the aircraft slows (essentially the reverse of the crosswind takeoff). In any landing, do not respond to radio communication until the aircraft is brought under control and braking is completed.
The Touch and Go
This is essentially the same as a landing except that after the aircraft has settled (nose gear on the runway), the flaps are retracted, and the throttle is smoothly advanced to the full power position. Because of the power increase, right rudder will again be required. Be sure to advance the throttle smoothly yet immediately. If you “jam” the throttle to takeoff position, the engine may remind you that it has been cooled from the approach and hesitates and sputters. Keep the centreline with precision during the roll phase.
The 50% Rule
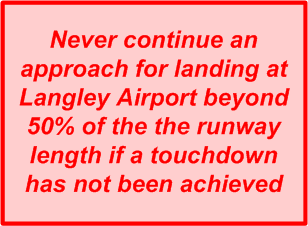
Never continue with an approach and/or flare if the main gear has not touched down within the first 50% of the runway. Your Instructor, however, may override this by asking you to carry on with your landing beyond this point, perhaps for the purpose of demonstrating the overshoot procedure. Otherwise, if you pass the 50% point without runway contact, initiate the overshoot or missed-approach procedure.
Overshoot
Initiate an overshoot whenever the approach and flare vary from “normal.” It is especially important to initiate an overshoot immediately in the case of flare that is established too high above the ground, or when a drift from the centreline occurs. Recognize these undesirable variations early and act quickly. Immediately but smoothly select full power, place the aircraft in the climb attitude, and smoothly retract the flaps one notch at a time. The flap recovery cannot be delayed or the aircraft will begin to slow to unacceptable (and potentially dangerous) speeds. As well, the pitch selected must not be higher than that used in a normal climb—again this is a crucial matter of safety. Proper overshoot procedures are important and should be practised.
Simulated Forced Approaches in the Circuit
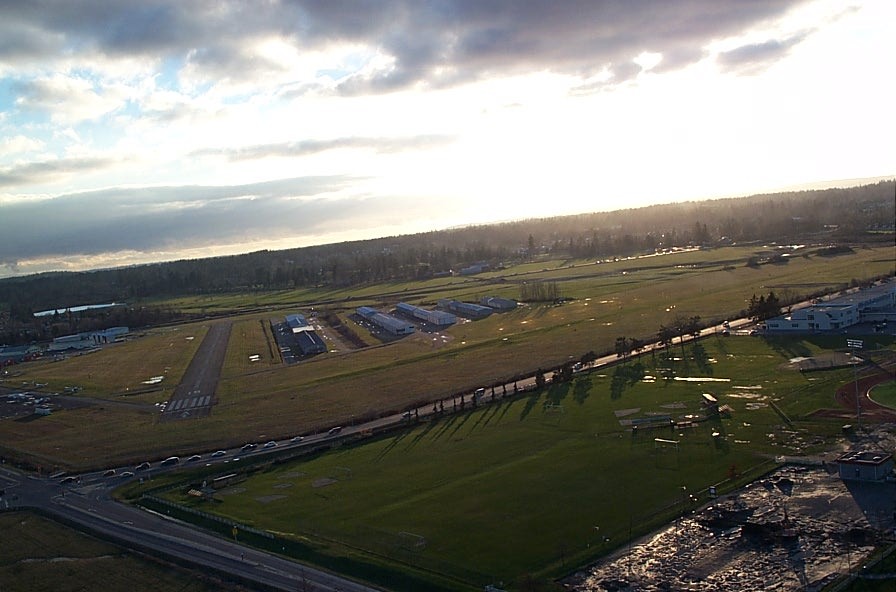
Once your control during landings reaches a competent level, your Instructor will be introducing simulated forced approaches. Eventually, these will be practised at all phases of the circuit (except of course when the practise itself would present a hazard).
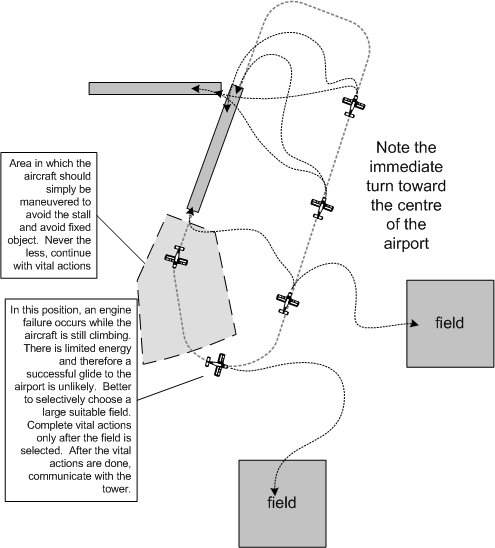
When a simulated forced approach is initiated on the departure leg, simply follow the actions that you prescribe in your pre-departure briefing. Select the best field available and begin to manoeuvre the aircraft for a landing, and then complete your vital actions. Never fall into the trap of attempting to turn back to the runway—the so-called “dead-persons turn.” Simply pitch forward to prevent a stall, and make gentle turns to avoid fixed objects. This is prescribed any time below 800’ AGL in the departure leg.
During the crosswind leg the aircraft is still climbing and there is not a lot of airspeed energy that can be converted into glide distance. In the crosswind leg, then, you are best to look for a sizable field for an emergency landing. You will have time to be selective, but you must make your decision quickly. Remember, it is important to immediately turn ON the carburettor heat and establish the aircraft in the proper glide. But no other vital actions should be undertaken until the field is selected.
In the downwind leg the aircraft has sufficient energy to seriously consider returning to the airport, but your actions are critical here, as you must immediately turn towards the centre of the airport if you want to preserve any height for manoeuvring. Any delay in the turn will not only remove the opportunity for properly planned manoeuvring, but you could very well come short with respect to glide distance. Once you have turned toward the centre of the airport, it is time now to complete your vital actions—it is likely that the problem you are experiencing can be remedied. The carburettor heat will melt any ice that may have formed, and now you should act to switch fuel tanks, turn on the electric fuel pump, and check your mixture setting. Overall, these items will be covered by doing the standard pre-landing checks. Know that you should try different throttle and mixture settings. Know also that a backfiring engine may indicate that a magneto self-destructed—try selecting individual magnetos, rather than “both.”
After the vital actions are completed, communicate with the tower—a simple “GABC . . engine failure . .” will suffice. The tower will clear any traffic that might get in your way.
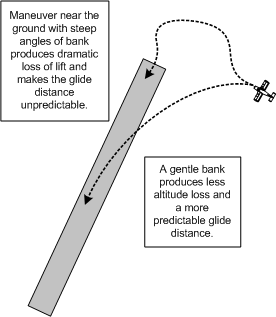
After you have turned to the airport and are assured of being able to glide to the general vicinity of the airport grounds, begin to manoeuvre your aircraft for the touchdown. Plan your turn onto the final approach to ensure the touchdown is safely inside the airport perimeter fence. Your initial target for touchdown should be the centre of the runway; after turning final with excess altitude, you should then attempt to shorten the glide through the use of slipping and flaps, and thereby move the touchdown target from the centre of the runway to the threshold area. If you see that you will be uncomfortably low for the turn onto final approach, round off the turn by lessening the bank, with the idea that you will land further down the runway—it is far better to take a long landing than continue what may become a steep turn near the ground. Remember that all runways are available to you in an emergency—the cross runway is particularly useful if you are low on attitude, as less turning will be required.
Your Instructor will state “recover” and you simply yet carefully initiate the overshoot procedures (remember to select carburettor heat OFF). When a simulated forced approach is initiated from the downwind leg, immediately begin to manoeuvre the aircraft for a landing on the active runway. Abort the square pattern associated with a normal circuit approach and begin “circling” approach, turning slowly through the normally straight and square base and final legs. Adjust the radius of the circling approach as a strategy for dealing with altitude. If you are high, expand the circle radius; conversely, if you are low, shorten the turn radius. Do not commit to flaps until you are assured of making the runway. When the runway is assured, smoothly select the appropriate flap setting, and input a slipping turn to bleed off excessive altitude. Throughout simulated forced approaches correct airspeed is crucial, initially gliding at 80 MPH, and bring this speed back to the appropriate final approach speed as you near the landing area. Always visualize a “key point” over which you plan to turn onto final, being sure to avoid anything but gentle turns as you approach the selected landing area. Simulated forced approaches, and your ability to fly them, is a good indication of when you will be released for solo circuits. Your Instructor must insure you are competent with simulated forced approaches before you go on your own.
When practising simulated forced approaches, never change any cockpit control settings—i.e., mixture control, fuel selector, etc. Instead, carefully touch the control setting with your hand and say out loud the action you would take. The one exception to this is carburettor heat, which should be turned on during a simulated forced approach to keep the engine warm.
Variations for Crosswind Landings
One of the more challenging variations in landings are landings with a crosswind—that is, the winds are not perfectly aligned with the runway centreline. The first thing to remember—and emphasize—is that rarely are the winds perfectly aligned with the centreline and therefore if you already have a few hours of circuit training under your belt, you are already aware of the subtle strategies used by pilots when landing in crosswind conditions.
When faced with a crosswind, it is common for pilots to divide the normal final approach leg into two sections or parts, the dividing line for which is approximately one-half mark along final approach. The first half of the final approach is flown using the crab method for maintaining a track line in crosswind conditions—that is, the pilot responds to the crosswind condition by smoothly adjusting the heading of the aircraft so as to compensate for drift whereby the nose is pointed into wind sufficiently so as to prevent any drift from the final approach centre line track (crabbing). The second half of the final approach is flown using a side-slip—here the pilot responds to the crosswind condition by smoothly adjusting the bank of the aircraft, while simultaneously responding with coordinated rudder input to now keep the nose point down the runway line.
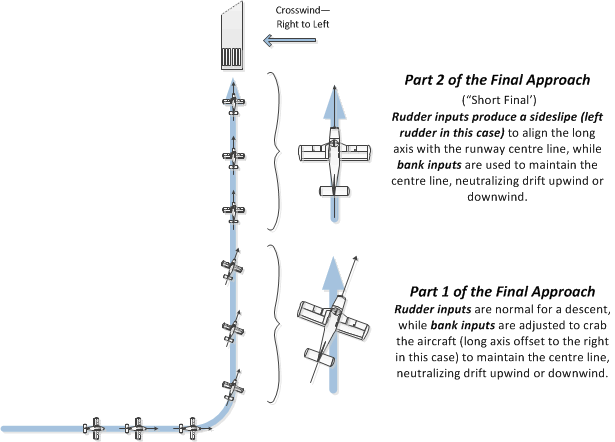
The first part of the final approach—the crabbing portion—the pilot simply focuses on the centreline and maintains the appropriate heading into wind that will produce the straight track to the runway threshold. For the pilot, this is an opportunity to get a measure of the wind conditions, with the degree of crab angle used providing a crucial indicator of the magnitude of the crosswind condition prevalent for the approach and landing.
The second part begins with the transition to the side-slip, usually initiated with the smooth input of rudder to swing the nose to align with the runway. Simultaneous, so as to protect and maintain the centre line tracking, coordinated roll is initiated to establish and maintain a bank angle that is sufficient to offset and neutralize the drift that would otherwise be produced by the crosswind. The following illustration is derived from the Flight Training Manual:
.jpg)
The great challenge of crosswind approaches and landings is ongoing need for the rudder and bank inputs to be coordinated. Typically, unless the crosswind falls off near the ground, this coordination must be carried right through to the touchdown and roll-out. Here is how it works: If the pilot elects to increase the angle of bank because a drift downwind is detected (indicating the bank is insufficient), there must be a coordinated increase in the rudder pressure in the opposite direction so as to keep the long (longitudinal) axis aligned with the centre track of the runway. Similarly, if the need for a decreased angle of bank is noted because the aircraft is drifting upwind of the centre line, a coordinated decrease in rudder pressure is required if the long axis is to continue to be pointed down the runway. This is one of many "surgical procedures" that are periodically performed by the pilot—"smooth" and "gentle" are the words, and "coordinated" is the action.
Speed control in crosswind landings is normal, but be aware of gust conditions (which are typically coexistent with crosswinds) and add one-half the gust value to your final approach speed if necessary.
Continue the coordinated side-slip inputs right through touchdown and roll-out. A good crosswind landing means the up-wind main gear will touch-down first.
Continue and increase the aileron inputs into wind during the roll-out, progressively rotating the column toward full into-wind input as the aircraft slows—this locks the wing down to ensure it doesn't become airborne or doesn't lighten (in weight) the main wheels.
Never force an aircraft onto the ground in a crosswind—the touchdown sequence--main gear first, then nose wheel—is normal.
Always drink coffee and chew gum when you anticipate crosswinds . . . (just kidding, sort of!).
Practice lots.
Further Reading
Transport Aircraft Crosswind Landing (short video)
Short-field Landings
This approach and landing is quite similar to normal landings at Langley as we apply short field technique all the time in response to the limited length of our runways. Generally, attempt to target the start of the flare over the clear grassy area that precedes the edge of the runway pavement. The approach speed and flap setting is in accordance with the Pilot Operating Handbook. Despite the early flare, the landing is quite normal, except that the flaps are retracted and braking initiated as soon as the nose gear settles. Premature placement of nose gear on the runway raises the risk of wheelbarrowing and making ineffective use of aerodynamic braking. Do not “hammer” the brakes—this is dangerous and is hard on the airframe; instead, be firm but smooth with the brakes, being sure to maintain the aircraft precisely on the centreline.
Obstacle Landings
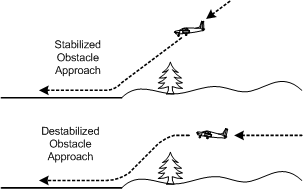
With an obstacle landing, the pilot should manipulate the glidepath angle so that a straight-line glidepath is flown that will provide safe clearance over the obstacle—this will entail increasing the angle of the glidepath. Full flaps should be used in the case of a short field, and precise speed control is crucial. As the obstacle is cleared, the power should be smoothly reduced as necessary for the landing. What you want to avoid is approaching the obstacle with a flat glidepath, and “chopping” the power to dive for the landing area—this combination of radical power and glidepath changes can result in your arriving at the runway without pitch control (and the inability to conduct a landing flare).
Soft-field Landings
The soft-field landing is essentially similar to the short-field landing except that very slight power is applied during the flare to lighten the touch down. Soft-field landings are difficult at Langley owing to the short runways; by applying the short-field technique, the aircraft is positioned early over the threshold to compensate for the additional runway length that is consumed during the flare with application of slight power. This power is maintained after the point of touchdown and the control column is fully extended rearward as the aircraft slows during the ground roll, the goal being to have the aircraft slowed as much as possible before the nose gear is placed on the simulated or actual soft surface. Keep the column full back until the aircraft is taxied clear of the runway.
Power-off 180° Accuracy Approach
Commercial Pilots should incorporate the accuracy approach at the finish of every training flight so that they are familiar with the manoeuvre by the time they arrive at their flight test. Importantly, this manoeuvre is almost identical to the forced approach, where the approach path is manipulated through the use of slipping and flaps, but it should be conducted using a circling approach and should not entail any of the rather dramatic manoeuvring seen with the bow-tie or figure eight approach patterns.
Perhaps the most critical feature of the accuracy approach is the need to plan the position of the downwind leg much closer to the runway than is used for a normal power-on approach. From the normal position of the downwind leg (power-on approach), the aircraft with its power set to idle will have to be immediately turned directly toward the threshold of the runway if a landing on the runway surface is to be made—this is, of course, the simulated forced approach, and it often requires radical adjustments in the track of the aircraft as the pilots positions the aircraft on short final, using varied combinations of bank and slip. In contrast, the ideal accuracy approach involves a stabilised track and bank—or at least as close as possible to this ideal. This can be done more readily with a tighter downwind leg, ensuring that you are not desperately short of altitude as you perform the circling approach.
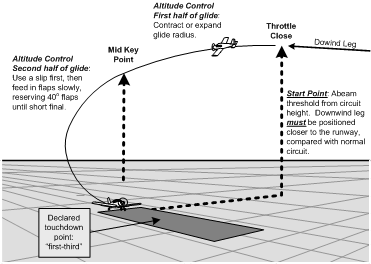
Remember, too, that the “circling” feature of the approach gives the pilot the advantage of a more constant rate of closure with the landing area, which in turn means greater predictability of the outcome of the glide, and easier assessment of when to apply slipping and flaps.
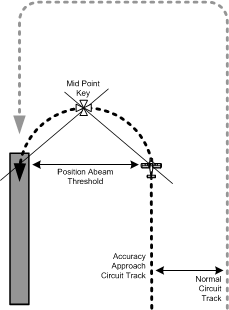
To assist you in your perspective of how the approach is to be managed, take a visual snap-shot of the manoeuvring area between your aircraft and the threshold when the throttle is closed to idle. In this snap-shot, visualize a triangle (as depicted on the left) which defines your Mid Key Point—the halfway point in your circling approach. Remember to adjust the Mid Key into wind if necessary—on a really windy day, tighten up the triangle aggressively. With the position of Mid Key in mind, roll the aircraft to constant bank and turn-rate that we take you over the Mid Key position, keeping in mind that the constant bank (and therefore constant rate of turn) will give you greater accuracy in your assessment of the glidepath, and greater probability for success. Nevertheless, be prepared to increase your rate of descent. This should be done, firstly, with a slipping turn, and secondly, with the use of flaps. Just as a reference, use flaps to increase the rate of descent only after the Mid Key is passed. Ideally, you should be able to replace slipping with flaps and therefore ease up on the slip inputs as the flaps are applied smoothly and sequentially. Ideally, too, pause after each flap deployment so that you can assess how the new flap setting is affecting the glidepath. Of course, you may have to extend flaps in rapid succession, and you may have to continue with an aggressive slip, if your have excessive height—but, whatever you do, do it smoothly.
Include during your practise of this exercise varying the distance of your starting point abeam the runway—find the position that works best for you. Also, be prepared to delay the start point of the manoeuvre owing to traffic conflict—practice this deferred start as well. Note that if you are required to extend your circuit owing to traffic, there is a point along the downwind leg at which you should defer closing the throttle until you are on final approach (as is provided for this exercise in the Flight Test Guide). Ideally, you would attempt to keep your extended circuit close to the runway, but this may not always be possible owing to traffic—if you are forced to extend the downwind leg beyond gliding distance from the runway, wait until you again come to within a comfortable gliding distance on final approach.
Flight Safety for Circuit Training (link)
References
1 This is the final approach speed corrected for the predicted landing weight calculation derived from the aircraft performance exercise.
2 Repetition and standardization is also crucial in your ability to detect abnormalities during an approach, particularly the effect of abnormal winds such as crosswinds or wind sheer. Repetition and standardization means that power, pitch, and flap changes are made in a similar fashion and at similar times during the approach—the effects of the changes are predictable. When the effects of these changes vary, you are more easily alerted to external factors that are influencing or affecting an approach for landing.
3 In fact, the airspeed indicator is just a measure of the aircraft’s performance with respect to lift—the angle of attack, that is. Turbulence and lag (primarily associated with changes in the aircraft’s momentum) are primary causes of inaccurate airspeed indications.
4 If the airspeed slows excessively, there is insufficient airflow over the control surface, making the response of the aircraft sluggish and somewhat unpredictable. There is also risk of a premature stall during the flare process. It is necessary, of course, to slow the aircraft to the diminished control speed range prior to touchdown, but this transition should be done under the influence of ground effect, where the loss of control is compensated for by the “super-lift” that exists in the ground-effect condition. So, while you must reduce speed below the aircraft’s published final approach speed, this should only be done as the aircraft enters ground effect—most effective at a height of one-half the wing span.
5 Runways 01 and 19 at Langley Airport are equipped with Precision Approach Path Indicators (PAPIs), that provide visual indications of the 4.5° glideslope established for Runway 01, and the 4.0° glideslope established for Runway 01. Simply request the tower controller to turn on the PAPIs and you will get an amazingly precise indication of your position relative to these glidepath during final approach. For further information on how the PAPIs work, see General Section of the Canada Flight Supplement (approximately P. A67).
.jpg)
