.jpg)


FLIGHT TEST REQUIREMENTS
- FLIGHT TEST REQUIREMENTS
Preflight Planning Procedures
Aim
Students must demonstrate the ability to effectively prepare for a cross-country flight in a reasonable period of time.
Description
Before takeoff, students will be requested to plan a VFR cross-country flight, including an intermediate stop, to a destination at least two hours cruising range distance. The flight planning will be based on the actual weather to the first stop.
Note: The cross-country flight should be assigned prior to the flight test date, and students may make preliminary preparations, such as the initial route selection, map preparation, determination of tracks, selection of possible alternate airports, and the initial flight log entries before the flight test.
Private Pilot Students must
- use appropriate and current aeronautical charts and other current flight publications to extract and record pertinent information;
- properly identify airspace, obstructions, terrain features and map symbols;
- obtain pertinent information about the en route and destination airports;
- retrieve and interpret weather information and NOTAMs relevant to the intended flight;
- determine the acceptability of the departure and destination runways under existing or forecast conditions;
- select a safe and efficient route;
- prepare contingency plans for intermediate or alternate destinations;
- select the most favourable and appropriate altitudes, considering weather conditions and equipment capabilities;
- prepare a chart and a navigational log, including estimated headings, ground speed, fuel requirements and time en route;
- make a competent “GO/NO-GO” decision based on available information for the cross-country flight;
- complete an ICAO VFR flight plan(s) and simulate filing with the examiner;
- complete all planning, preparations and calculations, excluding weight and balance computations, within 45 minutes; or, where initial planning and preparation is completed in advance, complete all final preparations, including weight and balance computations, within 45 minutes.
- demonstrate practical knowledge of how to determine certain key elements of flight planning such as estimated time en route and fuel requirements.
Commercial Pilot Students must
- use appropriate and current aeronautical charts and other current flight publications to extract and record pertinent information;
- properly identify airspace, obstructions, terrain features and map symbols;
- obtain pertinent information about the en route and destination airports;
- retrieve and interpret weather information and NOTAMs relevant to the intended flight;
- determine the acceptability of the departure and destination runways under existing or forecast conditions;
- select a safe and efficient route;
- prepare contingency plans for intermediate or alternate destinations;
- select the most favourable and appropriate altitudes, considering weather conditions and equipment capabilities;
- prepare a chart and navigational log, including estimated headings, ground speed, fuel requirements and time en route;
- make a competent “GO/NO-GO” decision based on available information for the simulated cross-country flight;
- correctly complete and present an ICAO VFR flight plan(s);
- complete all planning, preparations and calculations, excluding weight and balance computations, within 45 minutes.
- demonstrate practical knowledge of how to determine certain key elements of flight planning such as estimated time en route and fuel requirements.
Note: Cross-country flights for the CPL flight test are not assigned in advance. The candidate will make preparations after the examiner confirms eligibility for admission to the flight test. Software-generated flight planning is not acceptable for this test.
Discussion
Prepare your navigation charts neatly and correctly, remembering that the Examiner will review your work. Your departure courses should be laid out on your VTA chart—in an effort to make your flight test easier and better organized, your SHP and first checkpoint should be on the VTA.1
Get ready to prepare a course to Penticton, Kamloops, or Princeton—these are routes commonly assigned by Vancouver Examiners. The decision of whether you go over the mountain or through mountain passes to get to the Interior should be based on the actual weather that is forecast for the day of your flight test. If the weather is really bad, tell the Examiner that you would not go on the assigned trip owing to this, but that you have prepared a course as if the weather were acceptable. You must know how to properly plot a course through a mountain pass.
Fill out the navigation paperwork correctly, as this will keep you organized. The exercise will likely begin with the Examiner asking you what the weather is like—if this question occurs, be sure to describe the weather systems that are affecting your flight—terminal forecasts and weather observations mean little with respect to a cross-country flight. It is suggested you visit NavCanada's website obtain copies of the weather.
With respect to the selection of the SHP (in addition to the discussion below), it should be located, if possible, along a straight line between the departure and destination airports. Calculate your distance carefully; as discussed above, the first line on your Worksheet should contain time, distance and fuel calculations for your initial climb only. The next line in your Worksheet should be your initial cruise leg, but be sure you include the distance flown during cruise flight between the estimated point at which you anticipate becoming level, and the initial SHP. In your flight plan and fuel-required calculation, be sure you include time for an approach at your destination airport—say, ten minutes.
Departure Procedure
Aim
Students must demonstrate the ability to perform an organized and efficient departure.
Description
When requested by the Examiner, students will be expected to depart on the cross-country flight as planned.
Performance Criteria
Private Pilot Student must:
- note takeoff time;
- use an organized and efficient procedure to intercept the pre-planned track;
- comply with all departure clearances and instructions;
- activate the flight plan with ATS or simulate an activation with the examiner;
- set the heading indicator by reference to the magnetic compass or other acceptable means;
- note set heading time;
- estimate the time of arrival for the first turning point or destination;
- complete appropriate checks.
Commercial Pilot Students must:
- set the heading indicator by reference to the magnetic compass or other acceptable means;
- note takeoff time;
- use an organized and efficient procedure to intercept the pre-planned track;
- comply with all departure clearances and instructions;
- activate the flight plan with ATS or simulate an activation with the examiner;
- note set heading time;
- provide an estimated time of arrival (ETA) for the first turning point or destination;
- complete appropriate checks.
Discussion
Whenever you are using your heading indicator to fly a prescribed compass heading, also begin by setting the heading indicator to the magnetic compass. This is part of your levelling procedures—setting your heading indicator—and perhaps the worst thing you can do is, after putting all that work into navigation preparation, forgetting to set your heading indicator. Also, remember that you are flying your “compass heading,” not your “magnetic heading.”
Do not “jam” yourself by selecting a set heading point that is too close to the departure airport—you want to try to ensure that, by the time you reach your SHP that you are level and trimmed, and that you have completed your level checks (including the setting of the heading indicator).
Correct trimming for hands-free flight is crucial here as you will have to do cockpit work, and watch your altitude control as the restrictions discussed below apply here. After completing your level checks, go back to your throttle to fine-tune the power setting after the aircraft has stabilized—accuracy is required here.
Attempt to cross the SHP on your correct compass heading, start your timer for the groundspeed check, and then take a minute to observe any apparent drift along your track line (left or right drift, not from the heading, but along the selected track).
When you cross your SHP, be sure that you note the time and enter this accurately in the proper space provided on the Navigation Summary Sheet.2
To help with flying the correct heading, use a distant landmark for reference; don’t rely visually on keeping the heading indicator properly aligned on the instrument panel—the heading indicator is too small a reference to use when you are busy with navigation tasks. Instead, once you have turned on to the proper compass heading, simply note any prominent distant landmarks that the aircraft is aligned with.
Throughout this time, maintain the correct spacing from clouds (make practical decisions on this en route—e.g., changing your altitude), and keep a special lookout for traffic.
Special Note for Commercial Students
If you have elected to use airways, be sure your radio navigation is properly tuned, identified, and tested prior to departure.
En Route Procedure
Aim
Students must demonstrate the ability to effectively apply systematic navigation techniques.
Description
After setting heading, the flight will continue until the student, using visual navigation techniques, establishes the heading and timing required to fly to the first turning point or destination.3
Performance Criteria
Private Pilot Students must:
- correctly use materials and equipment;
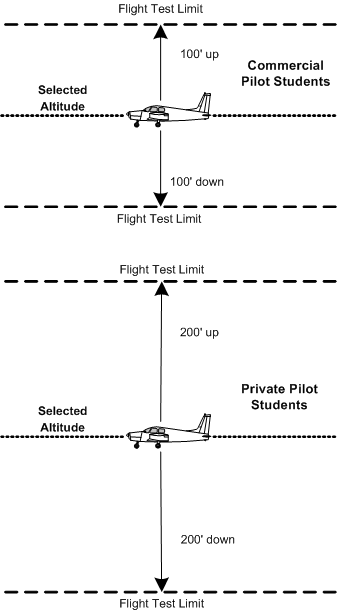
- maintain cruising altitudes (±200 feet), and headings (±10°);
- verify that planned cruise performance has been achieved, i.e. power and KTAS;
- navigate by applying systematic navigation techniques;
- verify the position of the aircraft within 15 minutes after setting heading;
- demonstrate an organized method that would:
- revise headings to correct any existing track error to maintain the aircraft position within 3 nautical mile of the route;
- confirm or revise the ETA for the first turning point or destination; and
- confirm fuel requirements.
Commercial Pilot Students must:
- use good cockpit management;
- correctly use materials and equipment;
- verify that planned cruise performance has been achieved, i.e. power and KTAS;
- maintain accurate records that reflect the progress of the flight;
- maintain cruising altitudes (±100 feet), and headings (±10°);
- navigate by applying systematic navigation techniques;
- verify the position of the aircraft within 15 minutes after setting heading;
- demonstrate an organized method that would:
- revise headings to correct any existing track error to maintain the aircraft position within 1 nautical mile of the route;
- confirm or revise the ETA for the first turning point or destination with a degree of accuracy that would make arrival within 3 minutes predictable; and
- confirm fuel requirements.
Discussion
After the aircraft heading is set, the flight will continue until you establish the headings and timing required to fly to the first destination using pilot navigation techniques.
Start map reading as soon as possible, being sure that you properly align the map on your lap—rotate the map such that the course you are flying is properly aligned with the heading you are flying.
Get ready for the Examiner to ask you for your position—Examiners often ask you to name a neighbouring town. Be sure you properly study the map before departure so that you are familiar with the layout of town, rivers, and other landmarks located between the SHP and the first checkpoint.
If strong winds are pushing you off course, start making adjustments in your heading right away to avoid criticism for not maintaining the track. If the drift is slight (i.e., within 2 to 3 miles), wait until you get to your first checkpoint before you make the correction, applying either the double-track method or the opening/closing angle method.4
When you arrive at your first checkpoint, note the time and enter it in the space provided in the Navigation Summary Sheet. It is good advice to place a prominent dot on your map with respect to your current position. Using the dot (current position), and before you provide an ETA, do the course correction using the opening-closing or double-track methods (if you don’t make the course correction right away, the aircraft will continue to drift, making your reckoning inaccurate). After establishing the aircraft on the new heading, return to your paperwork to complete the revising of the ETA at your destination or first turning point, whichever the case may be. It is crucial here to fill out the paperwork neatly and carefully—you want to be organized and avoid getting muddled up. Do the math (subtraction) to figure out how long it took to cover the distance between the SHP and the first checkpoint, and then apply this to your E6B flight computer. Be sure the E6B is at the ready, and the time and distance is accurately read. Be sure you place time on the inner ring and distance on the outer ring (and don’t get this reversed). After you read your groundspeed opposite the sixty-minute marker, write this on your Navigation Summary Sheet. Then—and this is really important—just take a few seconds to think about whether your calculation makes sense. If your finding is 150 knots or 75 knots, it is likely that you have made an error and you must re-examine your notations and your E6B work. You must declare to the Examiner the estimated groundspeed and the ETA, but you want to make sure that you don’t blurt out the wrong answer. Think before you speak, because you only get one chance at it. After providing the ETA, the exercise is virtually complete. This portion of the flight test must be practised over and over on the ground (without any cost), as it is crucial to get it right.
Diversion to an Alternate
Aim
Students must demonstrate the ability to perform the required in-flight planning and carry out a diversion to a suitable alternate destination.
Description
When requested by the Examiner, the student shall demonstrate the ability to select a suitable alternate destination that is within the actual or simulated fuel range of the aircraft. The candidate shall carry out a diversion towards the selected destination, or in the interest of flight test efficiency, towards another destination selected by the Examiner.
When practicable, a part or all of the diversion should be conducted at approximately 500’ above ground, or a minimum safe altitude, whichever is higher.
The student’s ability to proceed to an alternate using mental dead reckoning and natural geographic features such as roads, railway, and rivers, if they are available, will be assessed. Rulers, protractors, computers, or radio navigation aids shall not be used for this procedure.
The diversion will be continued until at least the stage where the aircraft is established on the proposed track to the alternate or is following a suitable geographic feature that will ensure arrival at the destination.
Performance Criteria
Private Pilot Students and Commercial Pilot Students must:
- perform the following tasks expeditiously:
- identify and record present position;
- select an appropriate alternate destination and route;
- identify the highest Maximum Elevation Figure (MEF) along the selected route and determine a minimum safe altitude for the actual route;
- select an aircraft configuration and airspeed appropriate for the actual or simulated conditions (for optimum ‘see and avoid’);
- estimate initial heading, arrival time and fuel consumption to the alternate destination;
- divert toward the alternate destination;
- maintain the selected airspeed (±10 knots) and selected headings (±10°);
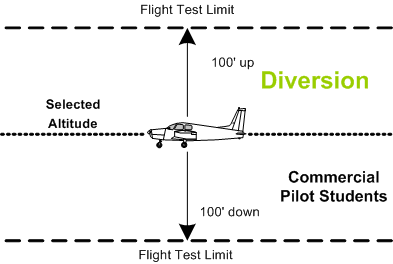
- maintain declared altitudes (±100 feet);
- provide an ETA that is sufficiently accurate to indicate that the diversion could be conducted as planned;
- establish or simulate communication with ATS to inform of intention to divert.
Note: The practice of following a geographical feature towards an alternate destination is reserved for the Private Pilot Licence flight test. Although the route may have to circumnavigate high terrain, where it exists, a practical demonstration of mental dead-reckoning skills is required on the Commercial Pilot flight test.
Discussion
Once the decision to divert is made and a new destination selected, the following procedure is to be used:
- Trim the aircraft for hands-free flying so you can effectively prepareyour improvised navigation with minimal control inputs. Use your feet on the rudder pedals to make gentle turns (hands off!).
- If the visibility is poor, either in actuality or by scenario, bring your speed back to the initial approach setting, combined with the initial flap setting.
- From your current position, find a reference line—such as a road, railroad, or river—that you can fly along (a straight course) while preparing your map. Halfway through your preparation work, turn back along the reference line toward the departure point. If the scenario provides for good visibility, select a prominent landmark in the direction that you wish to divert, and turn toward the landmark while preparing the chart.
- Draw a freehand line on your map from your present position to the new destination.
- After the line is drawn, estimate the heading you will have to fly. To make it easy, use a compass rose around a local VOR; align your pencil with the intended track and carefully move the pen parallel fashion to the compass rose to read your magnetic track (be sure you are familiar with the format of the VOR compass rose as it can be confusing). If a compass rose is not available, you will have to estimate the degrees true of your intended track, and then convert this into degrees magnetic. Either method, you will have to give due consideration to wind. The simplest way of doing this is to look down the imaginary track along the ground as you turn to your heading, taking a few seconds to see if the aircraft begins to show a wind drift trend. If drift is apparent, adjust the heading of the aircraft to turn into the wind until the drift stops and the track is maintained—then note the heading indicated on your heading indicator (make sure your heading indicator is set to your compass).
- When you establish your heading to fly, write it down on the map in big numbers and circle it (for easy identification). Also write on your map the time that you turn on to this course.
- Use the “thumb method” to estimate the time (not distance) en route to your diversion destination. If you are using a VTA Chart, the time required to fly the thumb (5 NM) at 100 KNOTS (115 MPH) will be 3 minutes, while the time to fly the same distance at 80 MPH at (70 KNOTS) will be 4.3 minutes (round this to 4.5 minutes). If you are using a VNC Chart, you will have to double these times. In doing your calculation, you therefore count the thumbs along the proposed route, and then multiply this by your time-per-thumb. Write the estimated time en route (ETE) on your map in big letters.
- Determine the time you are expected to arrive at your destination and write this on your map and put a square around it (again for easy identification).
- Now that you have started the diversion, quickly but carefully scan the route for obstacles and minimum altitudes. Circle obstacles. If you are using a VNC, take note of the Maximum Elevation Figure (MEF).
- Now you must confirm your ETA by using an actual checkpoint. Look on your map for something easy and obvious, preferably something that is a quarter, a third, or half the distance of the diversion. When you arrive at the checkpoint, you will easily be able to predict your new ETA by doing simple math. (Remember that the confirmation checkpoint is required on the flight test).
- Finally ensure you have sufficient fuel to complete the diversion, and contact FSS and advise them of your new destination and your ETA.
Remember, this exercise requires improvised flight planning, and a clear head when the “heat is on.”5 Keep things simple. Always be aware of the possibilities of “gifts.” A gift is a railroad, or highway, or river, that goes (directly or indirectly) to your diversion destination. If you see one, use it and your thumb bone to estimate your ETA. Finally, watch carefully for the need of having to fly through a control zone, getting the proper clearance in advance.
Flight Safety (Diversions)
- The cautions of low flying apply to this exercise. You must keep an eye out for traffic and obstacles, and if you are below 1000’ you should reduce airspeed. A reduced airspeed will also reduce the risk of bird strikes. Beware of antenna.
- Extra caution must be used when planning a diversion prior to turning on course. This is the time when your eyes are busy in the cockpit. Remember to pause frequently during your map preparation to scan for traffic. Trimming the aircraft properly and flying a reference line will reduce the workload and permit more effective scanning.
References
1 Remember that the Examiners want to use the airtime effectively and they will want to complete the ETA exercise with reasonably close proximity to Langley Airport. Also remember not to confuse either the distance units you are using—statute miles versus nautical miles—or the chart scales (the thumb is typically 5 NM on the VTA, but 10 NM on the VNC.
2 See the discussion regarding the preparation for checkpoints (P. 126), and the procedures for ETA updating during the first leg (P. 136).
3 Commercial students are not limited to visual navigation techniques, but are to use “systematic techniques.”
4 See the discussions beginning P. 134.
5 Diversion training typically involves the use of scenarios—whether provided by your Instructor during training, or by the DFTE during the flight test. Pay close attention to the “hypotheticals” with which you are faced—clarify the scenario with the use of questions, and fly the assignment with realism.