.jpg)


PREPARING FOR A CROSS-COUNTRY FLIGHT
Preparing the Chart
To prepare for cross-country flight, the first task is to draw a track line from your departure airport to your destination airport. However, instead of drawing the track from airport to airport, the track line should begin with what is referred to as a Set-heading Point—or SHP.
The SHP is a prominent landmark within the vicinity of the departure airport that will provide easy recognition from the air. It is the point where the aircraft is to be turned to the planned heading for the first leg—the leg that will take the aircraft either to destination, or the first turning point. Passage over the SHP is also the point at which the pilot begins a “time-trial” to determine the aircraft’s groundspeed (referred to as a groundspeed check). Based on the time that is required to travel from the SHP to the first checkpoint, the pilot determines the aircraft’s actual groundspeed and then predicts with great accuracy the estimated time of arrival at the destination (discussed below).
The SHP should be prominent and accessible—away from the departing circuit or control zone if applicable. It should also be sufficient distance from the departure airport so that the aircraft will be at its cruising altitude by the time the SHP is crossed, and of course it should be in the general direction of the destination airport.
Technically, the number of SHPs required for a trip depends on the number of takeoffs or legs—each takeoff and landing constitutes a leg, and each leg requires a SHP as the point at which you turn onto course.1
Once you have selected the SHP you can then lay out the track that you intend to fly by extending a straight line from the SHP direct to your destination. Use a coloured marker pen or highlighter if possible.
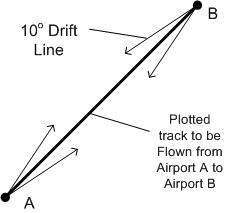
To assist in-flight correction, two drift lines are drawn on the map 10° either side of the track, diverging outward from the set-heading point, and converging into the destination. The length of the drift lines should be sufficient so as to provide position reference at the mid-track point.
Here, then, are the basic elements that are needed in laying out a course:

Quite commonly a pilot is unable to lay a navigation course directly from the SHP to the destination airport—owing, for example, to terrain or restricted airspace. In such cases a single leg may have a number of sub-legs or segments. The transition between sub-legs occurs at turning points, where the heading of the aircraft is changed:
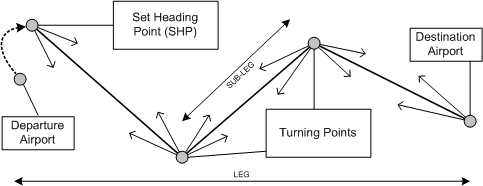
If your leg contains a number of turning points, each sub-leg should have separate drift lines. Pilots normally attempt to avoid turning points if possible, as each sub-leg is influenced differently by the prevailing winds and will therefore require a separate calculation for groundspeed, time, and fuel.2
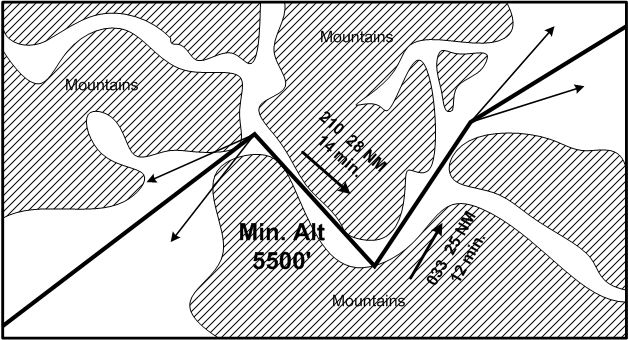
Flight planning a straight-line track over mountainous areas is conventional with respect to chart preparation. Often, however, there is a need to follow mountain passes—owing, for example, to weather restrictions or to the need to avoid desolate areas.3 If it is required to follow a mountain pass, the leg should be divided into a number of sub-legs and associated turning points (easily identifiable) that roughly correspond to the natural curves of the pass. The function of the sub-legs and turning points is to provide directional information—headings and times—that can be quickly and easily referred to during the flight should, for example, visibility unexpectedly deteriorate.4 Each sub-leg through a mountain pass should therefore be posted on the chart with heading, distance, and time figures. There should also be posted on the chart the minimum pass altitude that can be referred to should an unexpected descent be required during the flight owing, for example, to a gradual decrease in the cloud ceiling. This minimum altitude figure should be prepared in advance, based on a careful scrutiny of pass contour lines, or posted pass elevation figures. Here is an example of mountain pass routing:
Obstacle clearance is an important consideration for all navigation flights—mountainous or not. Once any track line is drawn, carefully note surface elevation and obstructions along each leg, with the idea being that you select a suitable cruising altitude.
Remember that when a large body of water must be crossed—such as the Strait of Georgia—consideration must be given to gliding distance capabilities of the aircraft—just in case an engine failure should occur—the pilot should be able to glide to shore should this occur at anytime along the leg.5
Remember also that the selected altitude is governed by the even/odd altitude rule (based on the magnetic track of each course leg).
Additionally, take the time now to survey the route and note aerodromes located in the vicinity of route that might be used as possible precautionary or emergency landing sites. Also look at the classification of airspace penetrated by your proposed course—determine if the flight will be penetrating controlled airspace or special use airspace (Class F).
Next, for each leg, mark ½ and ¼ points—these can provide very useful general reference during the flight. If a leg entails turning points, place ½ and ¼ marks on the associated sub-legs as well.
Also, for each leg, place five nautical mile increment marks along the track extending backwards from the destination airport—ensure that the correct scale on the aviation ruler is used as the scales are easily confused.6 Number the increments for reference during flight so that at any point during the trip the distance to the destination or checkpoint is easily determined.
Each leg or sub-leg (in the case of turning points) must have at least one checkpoint. The checkpoints will serve the function of allowing for quick calculation of actual speed and track drift based on the actual winds.7 The idea is that when the SHP or turning point is reached, the time is noted. Then, after passing the checkpoint, the time is again noted. The time required to travel the checkpoint is determined, and this is then entered into the E6B flight computer to determine the actual groundspeed. With the proven groundspeed known, the newly estimated time of arrival (ETA) at your destination airport can be predicted with an incredibly high degree of accuracy.8 Like the SHP, the checkpoint should be a prominent landmark easily seen from altitude. It should also be located along the first quarter or third of the track. Remember that the landmark need not be directly under the plotted track, but may simply be abeam the track.
Navigation Planning—Pre-weather
With the chart prepared, attention can now focus on recording data in a navigation planning form. A complete PDF copy of the Langley Flying School Navigation Planner appears as a link in the Ready Room of this website. .
An effective way to deal with the navigation paperwork is simply to fill out as much as possible, as early as possible. Weather data can only be obtained during a specified period of time in advance of the planned departure time—when valid FDs,9 GFAs, and TAFs, etc., are published—and of course the weather must be updated just prior to departure.
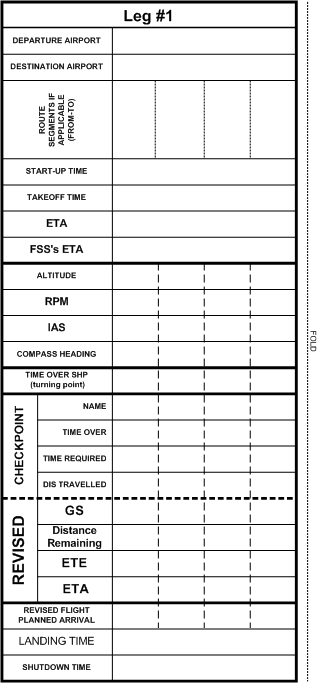
A sample navigation planner appears on subsequent pages. The first page provides a summary of all the important numbers that will have to be referred to during the flight—headings, altitudes, power settings, distances, and estimated groundspeed and time en route.10
When filling in the navigation data, extra caution must be given to the units used for recording distances. Never get confused as a result of mixing nautical miles with statute miles. The simple rule is to convert all distances to nautical miles—i.e., any distances associated with navigation should be NM, and not SM.11 Generally, the use of statute miles during flight—such as the Cherokee, for example—is limited to aircraft performance speeds, and are not generally used for navigation.
Note that the summary sheet also provides space to organize the record of times for the flight—just before takeoff, the time of departure can be noted, as well as the exact predicted time of arrival at the destination.
Finally, for each leg, the summary provides space to organize information for checkpoint calculations and ETA updating.
The second page is the main worksheet (above) where all the preparation work done in advance of the flight is recorded—it documents all the critical calculations and conversions that must be done—pressure, temperature, wind velocity, distance, time, fuel, and heading.12
The third page provides for airport sketches—information that can be readily referred to during the flight.13 The third page also provides for a summary of fuel requirements—fuel, of course, being the primary limited resource that governs any flight.
Weight and balance control appears on the fourth page.
Worksheet Entries
Continuing with the examination of pre-weather entries on the Navigation Planner, discussions below review the entries on the Worksheet.
Climb Segment
It is not uncommon for the rate of fuel consumption during the climb portion of a flight to be double the normal rate of fuel burned during the level cruise flight. The fuel burned during short climbs is not too significant, but it can be critical during long extensive climbs such as is experienced when attempting to get to an altitude sufficient to clear the Coastal Range or the Rocky Mountains. For this reason, a separate entry line on the navigation work sheet should always be dedicated solely to time, distance, and fuel for the climb. Besides this, the distance required to climb is important if you want to determine a workable SHP. Remember that the idea is to arrive over the SHP at altitude and with the correct cruise power set. Below are the elements that have to be considered:
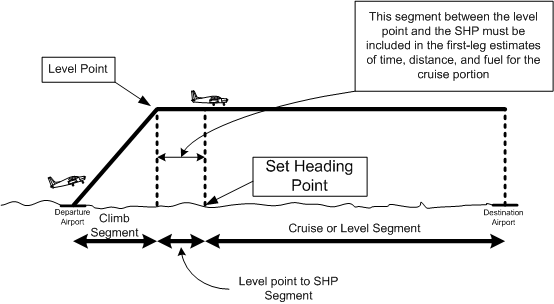
Importantly, the distance between the point at which the aircraft completes its climb (the level point or top-of-climb)) and the SHP cannot be left out of consideration—instead, this distance must be included in the cruise segment. Only with respect to determining groundspeed is the distance between the SHP and destination airport important. For the purposes of the worksheet, there is simply a “climb” segment, and a “cruise” segment. An example appears below:
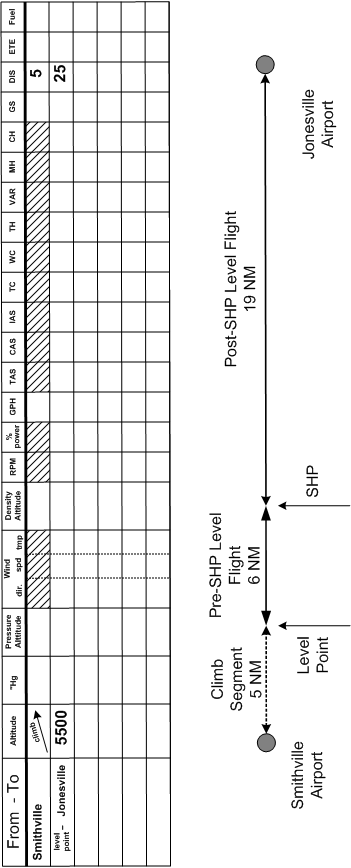
For each leg, then, you should have a minimum of two segments entered on the worksheet.
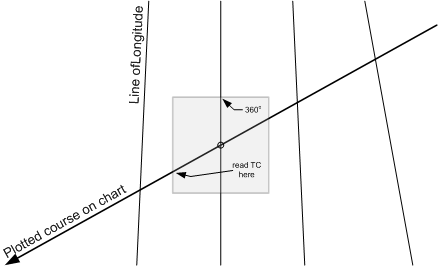
TC—True Course
The true course is determined from the chart using a Douglas Protractor. Find a line of longitude that is closest to the centre of each leg segment. Align the Douglas Protractor so that the 360°-marker (at the top of the Douglas Protractor)—or one of the etched vertical parallel lines—lies squarely on the longitude, and the centre grommet of the Douglas Protractor lies along the track line. Read the true course on the Douglas Protractor scale (located on the edge) where the track line passes—make sure you read the side in the direction of flight.
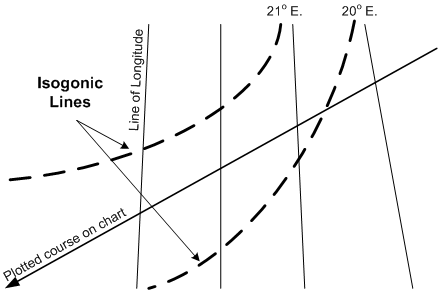
Variation
Variation is the “variation” between true north and magnetic north, and is indicated on the chart by isogonic lines. Typically, the plotted course may lie between two isogonic lines, so the average value of the two must be taken into consideration. Again, if possible, make reference to the isogonic values that lie near the centre of the track line.
Checkpoint Preparation
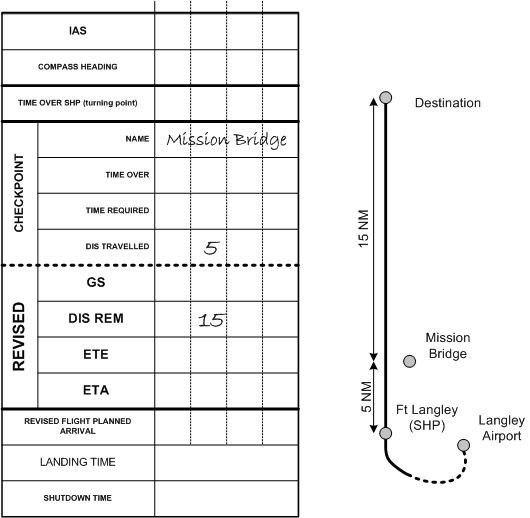
Prepare your checkpoint information using the first page of the navigation sheets, noting for each leg the name of the checkpoint, the distance travelled, and the distance remaining. Here is an example for a flight from Langley (CYVR) to Chilliwack (CYCW) with Ft. Langley as the SHP and Mission Bridge as the Checkpoint. The distance from Ft. Langley to the Mission Bridge we shall say is 5 NM, and the distance from Mission Bridge to Chilliwack is 15 NM:
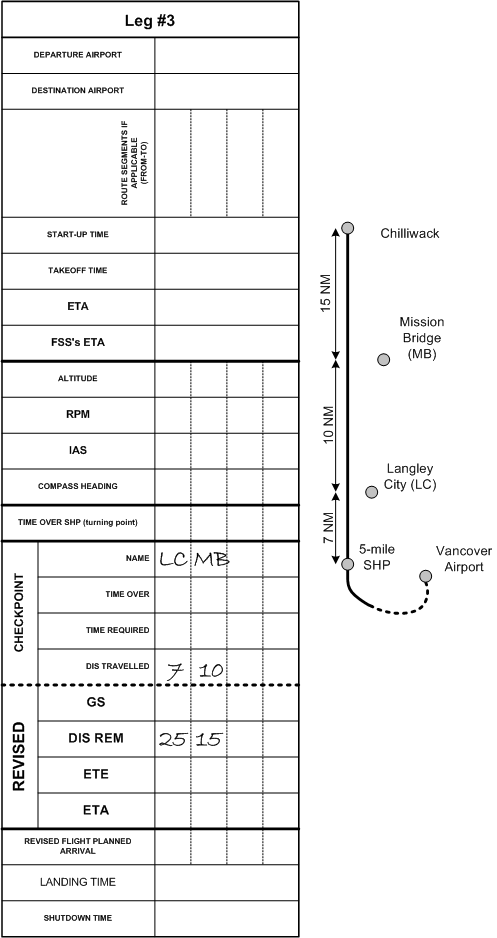
A similar arrangement is made for a leg with two checkpoints. In the following example, the flight is from Vancouver International (CYVR) to Chilliwack, with checkpoints at Langley City and Mission Bridge. We shall say that the total distance is 45 NM, that the SHP is 5 NM out of Vancouver Airport, that the distance from the SHP to Langley City is 7 NM, the distance from Langley City to Mission Bridge is 10 NM, and the distance from Mission Bridge to Chilliwack is 15 NM:
Airport Data
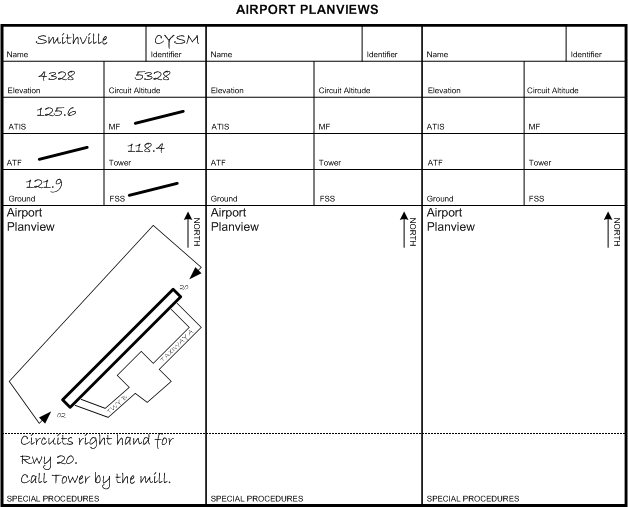
After organizing the checkpoints, sketch the destination airports as provided on the third page of the navigation sheets. Include the runway layouts, radio, elevation, and circuit data. Making use of information published in the Canada Flight Supplement, note any special procedures associated with these airports. The sketch provides a quick-reference guide that you can refer to as you approach your destination and help with the planning concerning how you will approach the airport, join the circuit, and taxi after landing. Here is an example:
Weight and Balance
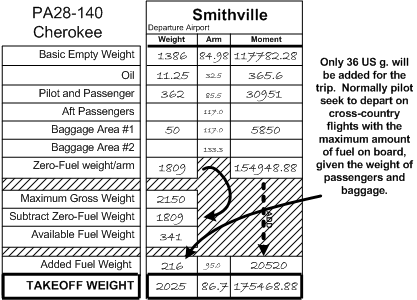
It is quite likely that the payload for the trip, including passengers and baggage, is known. Weight and balance can therefore be organized—see the fourth page of the navigation sheets, which includes provision for a zero-fuel weight calculation. The zero-fuel weight allows the pilot to determine the maximum amount of fuel that can be loaded given the payload weight. Here is an example:
Pre-flight (with weather information)
A complete briefing should always be obtained from FSS, either in person, or over the telephone. FSS should be advised of the nature of the flight—VFR, route, altitude, departure time, and the type of aircraft. Be prepared to give FSS the registration of the aircraft flown. If a “full briefing” or “standard briefing” is requested, FSS personnel will automatically provide you with all necessary information.14 Just in case, however, here is a summary of the information that should be obtained:
- Forecasted weather, including Graphic Area Forecasts (applicable to your route), Terminal Aerodrome Forecasts (applicable to your departure, en route, and destination airports), and the Upper Winds applicable to your proposed altitude and including forecasted temperature at altitudes.
- SIGMETs—i.e., short-term warning of certain potentially hazardous weather phenomena, such as thunderstorms, heavy hail, severe turbulence or icing, mountain waves, hurricanes, etc.
- AIRMETs—weather information when potentially hazardous weather conditions were not included in the Graphic Area Forecast at the time it was published (likely, as the forecaster did not perceive the conditions would develop).
- NOTAMs—applicable to your departure and destination airport, as well as to your route.
- PIREPS—recorded pilot observation appropriate to your route.
Perhaps obvious, but it is worth mentioning, that an important way of dealing with weather forecasts is to try to “visualize” what the weather will be like. Have an image of how the sky will look while standing on the ramp at your departure and destination airports, or how it might look flying up a valley pass given the forecast cloud heights and visibility. Be sure to ask the FSS person lots of questions.
Once you have the weather forecasted for your trip, specifically including the winds and temperatures, the main task of navigation planning begins. The second page of the navigation sheets can be completed as follows:
- Enter the anticipated Altimeter Setting. With the exception of the climb segment, convert all proposed cruising altitudes into pressure altitude values. These conversions are accomplished with the E6B.15
- Next, enter the wind information—direction, velocity, and temperature. Interpolation will be required here since the upper wind data is only forecast for the 3000’, 6000’, 9000’, etc.
- Using the temperature values, use the E6B to determine the density altitude for each leg.16
- Now, calculate for each leg the time, fuel, and distance required to climbfrom the airport of departure to the planned cruising altitude. This requires that you have density altitudes for the departure airport (correcting elevation for pressure and temperature), as well as your cruising density altitude, and these are applied (in the case of the Cherokee) to the Climb Performance Graph on P. 9-3 of the Cherokee Pilot Operating Handbook. On this Chart, obtain the rate-of-climb per minute for the elevation of the departure airport, and the equivalent value for your selected cruising altitude. To predict the time to climb to the cruising altitude, simply determine the average climb rate17 and apply this to the difference between the departure density altitude and the cruising density altitude. The resultant time should be entered onto the worksheet. Furthermore, once the number of minutes-to-climb is estimated, a determination can then be made of both the distance that will be travelled and the fuel that will be consumed during this time. Unless you have abnormally high wind speed, calculate the distance travelled during the climb based on groundspeed being equivalent to climb speed—i.e., 75 KIAS (converted from 86 MPH). The rate of fuel consumption for the Cherokee is not covered in the Pilot Operating Handbook performance graphs, but a safe estimate is 16 gallons-per-hour—a figure that essentially doubles the average cruise burn rate. The fuel and distance associated with the climb must be entered on the worksheet. Also, be sure to mark the predicted levelling point (end of climb) on the chart—remember that the remaining distance between the level point and the Set Heading Point will have to be included in distance of the level flight segment.
- Next, using the RPM setting that you wish to use during cruise (usually 2400 RPM18), determine the percentage of power and fuel consumption for the cruise legs of your trip. This is done by using first the Engine Performance Graph that appears on P. 9-4 of the Pilot Operating Handbook. At a density altitude of 1000’, for example, the aircraft will be producing just under 75% power with 2400 RPM, while at 9000’, 2400 RPM will produce just over 65% power. Repeat this for each leg, recording the percentage of power for each leg in the column marked “% power.” With this completed, proceed to the small insert table that appears in the Cruise Performance—Range Graphs on either P. 9-6 or P. 9-7. Interpolate the approximate fuel flow rate (gallons-per-hour) for each leg and again record this in the “GPH” column of the worksheet for each leg.
- Using the percentage-of-power figure determined from above, determine now the True Airspeed (TAS) at which the aircraft will cruise during each leg. To do this, the cruising density altitude and the percentage-of-power figures are plugged into the Cruise Performance-True Airspeed Graph that appears on P. 9-5 of the Pilot Operating Handbook. Record this in the “TAS” column of the Worksheet.
- The TAS should then be converted to Calibrated Airspeed (CAS) and then Indicated Airspeed (IAS). CAS is needed to determine IAS, and IAS, in turn, is needed to monitor cruise performance up at the altitude flown. CAS is TAS modified for temperature and pressure, and this conversion is done using the E6B Flight Computer.19 To get IAS, take the CAS value, and plug it into the Airspeed Correction Table that appears on P. 7-7 of the Pilot Operating Handbook. Keep organized with respect to the MPH/KNOTS—if using MPH, show this with a bold note on the worksheet.20
- Once TAS is determined for the cruise segment, the work is nearly complete. Now the “wind side” of the E6B is used:21
- Begin, by drawing a wind vector. To do this, first rotate the azimuth until the true direction of the winds is set opposite the “True Index.”
- Now slide the speed lines (marked on the square sliding card) behind the transparent azimuth until “100” (representing 100 KTS) is precisely under the “grommet”—i.e., the hole in the middle of the transparent azimuth.22 Now rotate the transparent azimuth until the wind direction expected during the cruise segment is aligned under the True Index.
- Now draw a line from the grommet directly upward in the direction of the True Index (which, of course, should match the direction of the winds); the length of this line should be proportional to the velocity of the wind—e.g., if the winds are 22 KTS, the line should extend precisely to the 122 KTS speed line.23
- Place an arrowhead at the end of the wind line in the direction away from the grommet—toward the True Index.
- Now rotate the azimuth until the true course (TC) of the segment is placed under the True Index.
- Then slide the speed lines (the square card under the rotating azimuth) so that the speed line representing the true airspeed value for this first segment is precisely under the head of the arrow.
- Now read the groundspeed under the grommet,24 and the degrees of wind correction (right or left) under the head of the arrow. The wind correction value is read, of course, off the splayed “degree lines” which are superimposed on the speed-line card. Now, keeping the figures organized on the worksheet, record the wind correction for each leg in the “WC” column, including the sign “+” for a right correction and “–” for a left correction. Groundspeed should be entered under “GS.”
- Now complete for each leg the correction for wind, variation, and deviation.25 Applying the wind correction value to the true course gives you the true heading. The true heading is then corrected for magnetic variation (VAR), with the resultant value being the magnetic heading (MH). To get correction for compass deviation, you must consult the compass correction card specific for the aircraft that will be flown.26
- Applying the groundspeed for each leg to the associated distance of the segment will provide the estimated time en route (ETE) for that segment. With ETE for a segment, the GPH value can be used to determine the fuel required for the segment.
Why all the detail on the Worksheet?
Two reasons actually. Firstly, we are dealing with a complex array of figures. The calculations are done to make sure we don’t get lost and, in particular, don’t run out of fuel. Should a worksheet be completed for every cross-country flight? Actually, after a while—with experience—you get good at estimating the time and fuel for a flight, but some cross-country flights will be more critical than others with respect to navigation and fuel consumption. If you were planning a trip to the Yukon or California, for example, attention to detail is of the utmost importance. If you are heading to Victoria for dinner at Mary’s, make sure you have sufficient fuel, the aircraft is not overloaded, keep your eye out for other aircraft en route, and enjoy your meal.
There is, however, a second good reason for attention to detail when completing the worksheet. For the flight test, the Examiner will have assigned a hypothetical yet detailed cross-country flight assignment. Rest assured, if you have made an error in your pre-flight calculations, it will be uncovered—and a sweaty oral examination preceding the flight test is something you do not want.
The Fuel Log
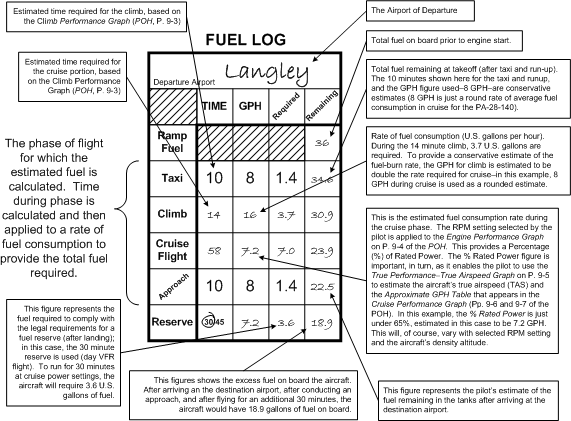
The fuel log found on the third page of the navigation sheets cannot be completed, of course, until the en route times are known. The fuel log provides a summary and is a means of double-checking that enough fuel has been loaded for the flight. A couple of features are worthy of note. Note that where it refers to “ramp fuel,” this is in fact the fuel on board (“remaining”) at the time of start-up. Fuel consumed for the flight phases listed below this line is then subtracted. For the taxi, 10 minutes is a conservative yet safe estimate—as is the 10 minutes allocated for the approach phase. The use of 8 GPH is again a conservative figure. Proper completion of the fuel log will contribute greatly to avoiding those white-knuckle feelings associated with thoughts of uncertainty regarding sufficient fuel during flight.
References
1 Of course lots of flying does not involve “textbook” navigation, such a flight in which you take up passengers to see the sights. Certainly you will be expected to demonstrate textbook navigation on your flight test for the licence.
2 The preference is of course to do straight-line navigation, but this is often not possible owing to terrain features, airspace restrictions etc. While the workload is increased, it is alleviated somewhat by the fact that the sub-legs are often subject to the same pressure altitude, density altitude, and TAS, so these calculation do not have to be repeated. The groundspeed will of course change, as well as the calculated headings that will be flown to compensate for the winds.
3 Planning for a mountain route flight will very likely be assigned for the navigation preparation exercise in the Flight Test.
4tercept, with each valley looking distressingly similar to the other. The question then arises as to which valley pass is in fact the actual pass routing. If you have prepared sub-legs, a known heading to fly could keep you out of trouble.
5 To establish your gliding distance, referred to the Glide Performance Chart on P. 9-8 of the Piper Cherokee Pilot Operating Handbook.
6 Typically, you will find one scale that is applicable to the VNC, and the other applicable to the WAC.
7 Incidentally, it is required that you demonstrate this on your flight test—it is typically the first flight-test item (departing on a simulated cross-country flight).
8 This is done as it is common that the upper winds are not as predicted in the FDs. The ETA is “updated” because a flight plan or itinerary was filed prior to the takeoff giving your ETA at the destination, based on a predicted takeoff time and forecasted wind data. This is the best estimate, but once the checkpoint is used, the revised ETA is highly accurate. Importantly, FSS should be advised of the updated ETA, even if it is to confirm the original pre-departure ETA.
9 Forecasted upper winds.
10 As you likely appreciate, a pilot must be highly organized with respect to navigation information during flight—you can’t just pull over to the side of the road and grab something from you briefcase. There is limited space—maps must be organized and properly folded, the E6B and the navigation data must be readily accessible (if any one of these ends up in the “third row” of a solo flight, a pilot will be extremely challenged, especially when flying in unfamiliar territory.
11 The E6B makes this conversion quite easily, using the conversion arrow located in approximately the 10 o’clock position of the “speed-side” E6B.
12 It is this sheet that is carefully scrutinized by the Examiner during your flight test—typically, they will pick one leg of the trip and make sure it all makes sense.
13 Before taking off on a flight to an unfamiliar airport, you want to spend the necessary time to be familiar with its layout and organization.
14 Typically, if you just start asking detailed questions, they will simply provide answers and nothing more.
15 Details for use of the E6B are not covered here. For information on this and other operations with the E6B, see Flight Computer: Circular Slide Rule Side in the Navigation Chapter of From the Ground Up.
16 Density altitude will of course allow you to plug into the performance graphs of the Pilot Operating Handbook.
17 This can be quickly done by locating the climb performance at the half-way point of the climb—i.e., if the aircraft is climbing from 3000’ density altitude and is climbing to 9000’, simply read the climb performance at 6000’ (340’ per minute), which is the median average.
18 2400 RPM is the normal cruise power setting where the engine is not overworked, but not under-worked as well. The problem, of course, is that TAS and fuel consumption varies with altitude despite a constant power setting.
19 On the “speed side” of the E6B, pressure altitude is placed opposite temperature (on the designated inner window), allowing you to read CAS on the inner scale opposite TAS on the outer scale—typically, instructions are written on the E6B.
20 More than one candidate has confused the speed units—if you don’t catch the error, it will be considered a major error.
21 For a description of the use of the wind side, see The Flight Computer: Wind Side in the Navigation chapter in From the Ground Up.
22 The use of the 100 speed line is simply so the wind vector line can be drawn in scale.
23 Again, the use of the 100-KT speed line is just for reference.
24 Note the “Gs”—Groundspeed under the Grommet.
25 The effects of the wind on heading and groundspeed will of course vary with each track.
26 The compass correction card values, incidentally, are transcribed in the aircraft’s Journey Log; simply check the entry for the date that the compass was last swung (which must be done at least once a year).