FORCED LANDING
Aim
Students must demonstrate the ability, in the event of an engine failure, plan, manage and safely carry out a successful landing on a suitable landing area.
Description
Engine failure will be simulated without advance warning by the examiner by closing the throttle to idle or by bringing the power lever to flight idle, as applicable. While accomplishing the required emergency procedures, the candidate will be expected to use good decision-making and fly a safe approach to a suitable landing area so that a safe landing could be made if the approach were continued to the ground.
Unless the intent is to execute a landing on a suitable surface, an overshoot will be carried out when requested by the examiner at an operationally safe altitude.
Performance Criteria
A. Control/Approach
Assessment will be based on the candidate’s ability to:
- control the aeroplane and initially establish the recommended best glide speed (+10/-5 knots);
- specify a suitable landing area and touchdown zone;
- fly an organized approach to the selected touchdown zone, considering aircraft altitude, wind conditions, terrain, obstructions and other factors;
Note 1: After initially establishing the recommended glide speed, the candidate may vary the airspeed and flight profile, as required to achieve a successful and safe approach, without exceeding any aircraft limitations.
Note 2: A change of field is acceptable from an altitude or point in the approach where a landing could still have been made on the original landing site.
B. Cockpit Management
Assessment will be based on the candidate’s ability to:
- complete the basic vital actions from memory;
- follow-up with a placard or a checklist for ‘Engine Failure In Flight’ emergency procedures, if time permits;
- simulate an appropriate radio call, when time permits; and
- perform an effective passenger emergency safety review.
Note: The candidate is expected to clear the engine at appropriate intervals during the descent. 2 In very cold conditions, it is acceptable for the candidate to configure the aeroplane by lowering some flap and using some residual power to achieve a normal power-off gliding descent angle and airspeed.
Discussion
Once the simulated engine failure is established, the vital actions checklist procedure (committed to memory) must be completed:
1. Control
Control the aircraft, adjusting the trim to obtain the maximum-distance glide airspeed. Take the time to do this correctly, as your ability to set trim correctly will ensure you do not deviate from the prescribed maximum-distance glide speed of 80 MPH. If it is trimmed correctly, and provided you do not push or pull on the control column, you are virtually guaranteed that the speed will not deviate during your manoeuvres for the landing.3
2. Carburettor Heat ON
This is a priority, as engine heat will quickly dissipate. In actuality, this should be done simultaneously as you take action to control the aircraft and set the proper trim. With the exception of forced approach due to engine fire, we must always assume that carburettor ice may have caused the failure. Be clear on this, as carburettor ice can kill an engine in many insidious ways. Placing the carburettor heat on will ensure that any residual heat will be sent through the carburettor to melt any ice if it exists. If you delay this action, the engine heat that existed will be irrecoverably lost.
When recovering from the forced approach (overshoot), ensure the carburettor heat is turned off to obtain maximum climb performance.
To restate, the action of placing carburettor heat ON should be skipped in the event the forced approach is due to an engine fire. If an engine fire exists, you must follow exactly as is prescribed by the aircraft manufacturer in the Pilot Operating Handbook. For the Piper Cherokee, the sequence is “Left to Right—Fire in Flight”—that is: fuel selector OFF, throttle CLOSED, mixture IDLE CUT-OFF, cabin heat and defroster OFF.” The cabin heat and defroster select off is done (and must be done quickly) to seal-off the firewall that separates the engine compartment from the cabin.
A note here is also required regarding simulated engine-fire practise. When practising this exercise, you must in fact leave the carburettor heat ON to keep the engine warm during the power-less descent. Remember too that you must regularly clear (warm-up) the engine to ensure proper power response for the overshoot that occurs at the bottom of the exercise.
3. Select Field
As stated, the above vital actions should be performed instantaneously. This quick action is required to ensure a bad situation doesn’t get any worse, but it is also done quickly (yet carefully) to ensure you will get on as soon as possible to the next crucial action—selecting an appropriate field for the proposed emergency action. It is easy to say that the action of selecting a field is the most important thing you do during this exercise—if you can’t land safely, any actions done prior to the landing are rather meaningless. So select your field carefully and quickly.
We can generally say that there are three types of fields that can be observed from the air—green ones, light-brown ones, and dark-browns one.
We can dispense with the dark-brown fields quickly—don’t use them, as they are usually freshly ploughed fields and any attempt to land will immediately flip the aircraft as the nose wheel digs in.
Light-brown fields are perhaps the best, although you must be conscious that ploughed fields, when they have dried, become light brown in appearance. More likely, however, light-brown fields are probably production fields that have been harvested. The crop has been removed, and therefore the surface has been firmed up with the passage of time (as the crops matured) and with the passage of harvesting machinery. The appearance of bales on the field would confirm harvesting has occurred, and now it is simply a matter of identifying a long straight track through the bails that is suitable for touchdown and rollout. Depending on what geographic area you are in, pasture fields—which are generally good for emergency landings—may appear light brown, and in the case of pastureland generally, it is a good surface to land on, but you must be concerned with uneven terrain. The appearance of cattle, horses, or sheep would confirm pastureland, and the more animals you see, generally the smoother the surface.

Green fields can be a bit tricky, and you should be aware of the hazards of this choice. On the one hand, green fields, if they are sod-farm land, can be the best there is for a forced landing. Conversely, on the other hand, they can be the worst if they are standing crop—the very worst would be corn in late summer and early fall. A standing crop, especially if it is tall,
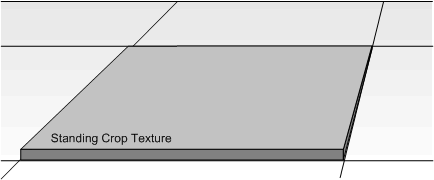
will flip the airplane, and it would be a bad thing to arrive at the end of your forced approach with the aircraft on top of you. So, how do you tell the difference between a bad green field and a good green field? The answer lies with your examination of the edges of the field, especially the corners. It is at the edges where you can see the texture of the crop. You can also see the texture in areas of poor production within the field itself, which appear as brown blotches—here too you can see texture.
The ability to quickly assess a field is a crucial skill. Take the time to fly around the practise area and study their appearance—your life could depend on it. Also, just to emphasize the hazards of ploughed fields, take the time to drive out in the country and try walking on one—the lesson will be quick, but be prepared to bring along some rubber boots!
4. Select Key Point
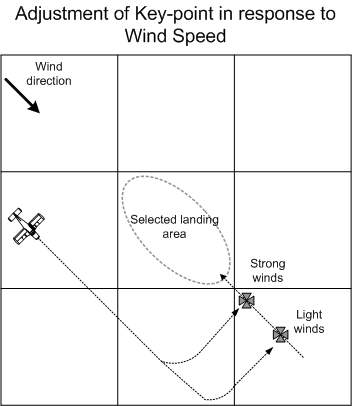
In accordance with the wind direction, select a key point (geographic reference) around which you are to plan your approach. The key point serves as a reference that will enable you to keep track of the field location. Importantly, its position should match the approximate position that you would turn final for the landing.
Wind assessment is important. Remember that it is likely that the winds have not changed from your takeoff winds if you are flying locally. You have to be careful when outflow winds are present in the coastal valleys, as these can create localized wind phenomena. Obviously, look for smoke trails from burning occurring on the ground. With crops, you can sometimes see the wind effect on the movement of the plants, but the winds must be pretty strong for this to occur. With water, remember that the wind flows perpendicular to wave rows, but this is only
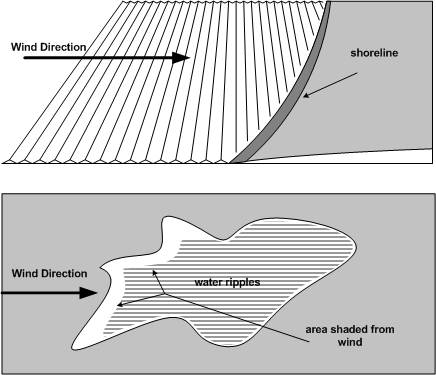
useful if you are near a large body of water where wave rows develop. For inland waters, look for the development of ripples. On the windward side of small lake or river (the side that is closest to directional source of the wind), the shore will shade the wind making the surface glassy in appearance; on the leeside, the ripples will continue to the shore edge. Trees can also be used—on the windward side of a tree stand, the leaves are upturned by the wind, exposing the lighter sides.
An important consideration is, of course, knowing the gliding capabilities of your aircraft. Generally, for the Piper Cherokee and other four-seat aircraft, the aircraft will be capable of gliding to any field that appears within a radius defined (from the pilot’s perspective) below the nose cowling and inside the wing tips. Just inside this radius, you will not have much excess altitude to manoeuvre when you arrive at the selected landing area; well inside this radius, you will, conversely, have lots of altitude to play with.
A key point is simply an identifying marker, such as a tree or a group of trees, a building, a pond, etc., that can be readily identified during the manoeuvring for an approach. It should be located off the approach end of the landing area at a distance from which you normally turn from base leg to final approach when you are doing a normal approach for a landing—typically, it should be between ½ to 1 mile from the threshold of the proposed landing area. The distance between the threshold and the key point can be adjusted to suit the wind conditions in which the approach is to be flown—if the winds are “normal,” the position of the key point should reflect the location of where you “normally” turn onto final in a regular circuit. However, if the winds are abnormally strong, then it makes sense to select any key-point marker that is closer to the threshold, anticipating the effect of the strong wind on reducing the glide-distance capabilities of the aircraft during the final approach phase.
5. Initiate Approach Pattern
There are three types of approach patterns that are generally used during a forced approach—what Instructors generally refer to as the bow-tie pattern, the normal circuit pattern, and the high-key/low-key pattern. The bow tie is generally the most popular among students, but often a combination of the patterns is used. As a rule, the type of pattern used varies with the circumstances of the aircraft type, the position of the aircraft, etc. The idea is to stay adaptive, during a forced approach, and of course adaptation requires flexibility in thinking and in action.
The high-key/low-key pattern is simply a circling approach (referred to in the Flight Training Manual as the “360° Forced Landing Pattern”), and it is the pattern taught in the Canadian military where high-performance, high-drag (and therefore steep engine-out glide) aircraft are typically flown. As the name implies, there are two key points, the first being the selected landing area itself—which is the “high-key”—and the point at which the pilot intends to roll out on to final—the “low-key.” The aircraft is flown over the high key, and a circling
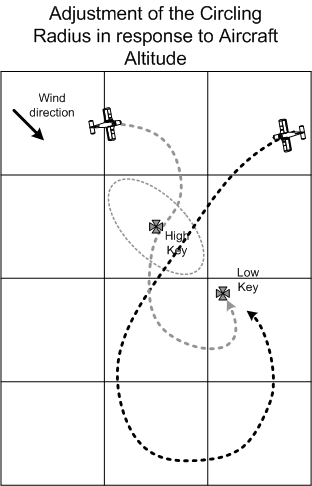
approach is initiated from here, with the intent of arriving over the low-key at the correct altitude. The radius of the circling manoeuvre is manipulated to take into consideration the altitude-loss during the circling. A pilot with excess altitude will widen the circling pattern to target the correct altitude required to cross the low-key. Conversely, with a shortage of altitude the pilot will reduce the radius of the circling manoeuvre. For smaller low-drag aircraft, the high-key/low-key method is extremely useful if an engine fails at a low altitude. For low altitude failures, the land area that appears behind the trailing edge of the wing, next to the fuselage (with the pilot looking over the left shoulder and downward), is an excellent target to strike using the high-key/low-key method.
The normal circuit pattern is really the same as the circling high-key/low-key method, except the course flown during the emergency approach is more conventional—like a normal circuit. It is usually defined around one key-point—approximately where the aircraft should turn final—but the circuit is expanded or contracted, depending on the aircraft’s altitude at the time of engine failure. In actuality, however, you should dispense with the notion that you have to keep square legs, and if the need arises, be prepared at any time to round a corner and/or convert to a circling pattern. The advantage of keeping square circuit legs, however, is that
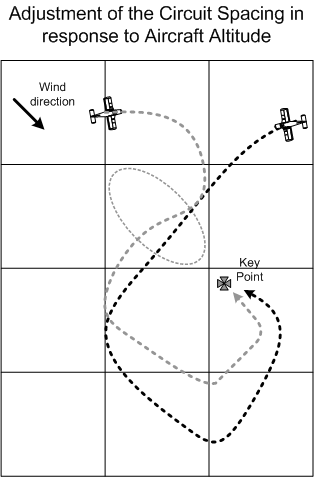
you are used this perspective in normal approaches, and this might provide better judgement for controlling the glidepath. A downside of the normal circuit pattern is that it tends to lead to a long straight-in final approach leg, and once you turn to face the selected landing area, you are largely committed to the position you have assumed—you can only bleed-off excessive altitude through the use of slipping and flaps. This is unlike the other forced-approach patterns where, for the most part, you can control and manipulate the track of the aircraft along the ground and therefore “gain” altitude by tightening up the track flown.
The bow-tie pattern gives you lots of latitude with respect to planning the approach, but it does have its drawbacks and hazards. Using this method, a key-point is selected and the pilot visualizes a “base-line” running through the key-point perpendicular to the planned final approach track. Essentially, the base line represents the left-base and right-base positions during a normal approach, and provides a line along which the pilot tracks back and forth as the aircraft descends for the landing. From any position, the pilot proceeds to the base line and begins to fly back and forth until the aircraft descends to what is judged to be the right height for the final approach, and from anywhere along the base line, proceeds directly to the landing area. Importantly, as you migrate up and down (or left and right) along the base line,
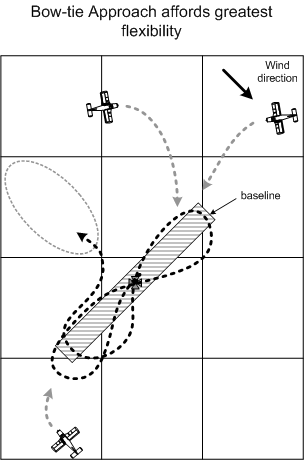
turns are always made toward the landing area. The drawback or hazard mentioned earlier is the tendency for pilots to crowd the field—instead of returning to the key-point after each end-turns, they end up inside the key-point. If this is repeated enough, the pilot can be faced with having to make a dangerously steep turn just before touchdown—something you must obviously avoid.
It is good advice, whichever the pattern you choose to fly, to make the target for touchdown the mid-point in the field; when a landing on the field is assured (based on visual clues) use slipping and flaps to move the touchdown point toward the approach end of the field. Remember that slipping is preferred to flaps in adjusting the glide, as the retraction of flaps in the event of an excessively low approach will entail the penalty of altitude loss—this will not occur when exiting from a slip. With the field assured, smoothly select full flap to slow the aircraft down as much as possible—the slower the aircraft, the more survivable the landing. Pitch control (and therefore airspeed control) is crucial during the approach, and you must maintain the maximum-distance glide speed.
6. Restart
In the case of engine failure (as opposed to engine fire), you must attempt to restart the engine during the descent—the idea being that the problem can likely be averted (as is the case, for example, with engine failures resulting from poor fuel management, or a failed fuel pump), and you want to avoid the innate and obvious hazards of a forced landing. Make it simple but effective. First, perform a standard downwind check—this will address all of the critical actions that must be done. The downwind check, however, does not address the option of using variable settings on the many ancillary controls available to the pilot—e.g., selecting individual magnetos, and trying varied throttle and mixture settings. So, beginning with the downwind check, move left to right in the cockpit, saying each item out loud, touching the item to ensure proper position. Then move back right to left, attempting variable settings on the following: mixture, throttle, magnetos, and fuel tank.
7. Emergency Communication
Once it is clear a forced landing is unavoidable, an emergency communication must be relayed as quickly as possible. Here is the standard communication made by the pilot:
“Mayday, Mayday, Mayday. This is GABC, GABC, GABC. Engine Failure. Seven miles east of Ft.Langley. Putting down in field. Two passengers. GABC Mayday."
This communication will ensure that available emergency services are provided to you and your passengers, and more importantly, a broadcast of the accurate location of the forced landing will ensure rapid search and rescue. Be clear on the content of your emergency message—identification, circumstances, location, and intentions. Timing is important here, as more people will hear your broadcast the higher your altitude when the radio is used.4 If you are on an active ATC radio frequency, broadcast immediately. If you are on a pilot-only frequency, your success in communicating your distress message is dependent on others relaying the communication. Conversely, if you have any doubt as to whether or not someone else will receive your signal, immediately switch to 121.5 MHz for your broadcast—all ATC and FSS units monitor 121.5 MHz continually, and many aircraft do likewise.
8. Passenger Briefing
Instruct your passengers to remove any sharp objects from pockets, remove any dentures, tighten seat belts, store and secure any items in the cabin, open cabin doors, and brace their head with their hands clenched behind their necks.
9. Pre-landing Shut-down
As your last actions just before touchdown, secure the aircraft against possible fire—turn the fuel selector OFF, the mixture OFF, the magnetos OFF, and the master switch OFF. If you are flying a Cessna equipped with electric flaps, be sure you have competed your use of flaps before you turn off the master switch.
Flight Safety
- Before you conduct a simulated forced approach, ensure that you visually check for traffic below, keeping in mind that you are likely in the practise area, and it is not uncommon to have other training traffic doing low-level manoeuvring. During a prolonged descent, it is dangerous to maintain a constant track as the airspace below and behind the aircraft becomes an extremely dangerous blind spot—continue with periodic turns that will provide shifting of your blind spots and therefore greater safety.
- Ensure the engine is periodically cleared during the glide. As the risk comes from a cooled engine failing to respond during the overshoot and recovery, this periodic run-up of the engine will keep it warm.
- Ensure that you do not change any settings in the cockpit during the simulated vital actions for restart (in the case of a simulated engine failure, or vital actions for shutdown (in the case of a simulated engine fire). You are only required to touch the items that you checking and say the items aloud; if you actually change an ancillary control setting, your Instructor may not be aware of the change and safety becomes compromised.
- Since safety risks associated with low flying exist, be sure you maximize the time you check outside the cockpit, being attentive to obstructions and traffic. Airspace must be cleared before performing turns, as is always the case. Never descend below 300’5 above the highest obstacle in the landing area (except at the discretion of the Instructor or Examiner). While practising forced approaches, conform to the minimum altitude requirement in a non built-up area—at least 500’ from the nearest structure, vehicle, or person.
- Pay attention to proper flap retraction during the overshoot or climb out, ensuring the aircraft is in a climb attitude and well clear of ground before slowly and smoothly retracting the flaps. You may have to select obstacle-clearance flap6 settings until obstacles are cleared. Follow the full-flap recovery procedures outlined in the Pilot Operating Handbook.
- Ensure that carburettor heat is off during the overshoot so that maximum climb performance is obtained.
References
1 Or engine fire.
2 “Clearing the engine” here means running the RPMs up briefly to warm-up the engine.
3 The risk for a speed deviation is greatest during the final turns that precede the touchdown, especially if you find the need to increase your angle of bank. Remember that steep turns during any phase of this exercise are regarded by Examiners as potentially hazardous when conducted in close proximity to the ground, and you want to plan ahead (with respect to your mental projection of how you plan to manage your glide and track) to reduce the need for steep turns as much as possible. But, if you have to increase bank, make sure that you do not simultaneously pull back on the control column, and therefore inadvertently slow the aircraft below the target speed. Remember, an aircraft’s stall speed accelerates as the angle of bank increases. A steep turn is usually associated with the pressing need to change track rapidly, and the tendency of students is to pull back on the controls to aid in the desired track change—don’t do this.
4 As you descend, the line-of-sight limitation of your VHF radio signal will reduce the number of those within the reception radius.
5 Student practising forced approaches solo will be initially restricted in their practise descent not below 500’.
6 Obstacle-clearance flap is essentially the flap setting prescribed in the Pilot Operating Handbook for speciality takeoffs.
.jpg)
