.jpg)


SLIPPING
Aim
Students must demonstrate that they can slip safely and effectively to lose altitude.
Description
You will be required to use a forward slip or carry out a slipping turn to lose altitude.
Performance Criteria
Private Pilot Students and Commercial Pilot Students must:
- smoothly establish an effective slip;
- maintain a slip appropriate to the flight profile and crosswind conditions, where they exist;
- in the case of a forward slip, maintain the intended flight path.
- recover smoothly to coordinated flight;
Note: Any significant skidding manoeuvre is unacceptable.
Discussion
The terms forward-slip, sideslip, and slipping turn can be very confusing for students. This can be quickly dispensed with. Forward slips are used to accelerate a descent. A slipping turn is simply the use of a forward slip during a turn. In contrast, side slipping is used only for crosswind landings, and that’s all. See the depiction below.
Forward slips (including slipping turns) and side slips are similar insofar as both entail what are referred to as cross-control inputs, but that is as far as the similarities go. Cross-control inputs simply means the pilot is inputting for a roll in one direction, and accompanying this with rudder inputs to produce yaw in the opposite direction—thus, left roll and right rudder, or right roll and left rudder.
The crucial difference between forward slip and sideslips is the position of the longitudinal (long) axis of the aircraft. With the altitude-losing forward slip, the long axis is purposefully moved away from the flight path of the aircraft (in order that the side surfaces of the aircraft’s fuselage, etc., become exposed to the air stream), thereby increasing aerodynamic drag. With the crosswind-landing sideslip, the pilot seeks to keep the long axis from aligning into wind, and instead aligned with the runway centreline (the long axis is therefore kept aligned with the flight path of the aircraft and also the runway centreline).
In entering any slip (forward, side, or turning), the inputs should be smooth and reasonably slow (with experience you will get faster, yet still retain your smoothness). Remember that you are crossing the controls, so you must input slowly so that the hands can keep up with the feet (and vice versa).
With a forward or turning slip, it is best that you lead with your foot (“foot-first’). In a forward slip, the pilot usually wants the best view of the runway surface ahead and below, so it is best that you lead with the right foot. The more you want to slip, the more the rudder pedal should be pushed to the floor. As the rudder is pushed, the ailerons simply make adjustments (increase or decrease the bank) to maintain the selected track (preventing the rudder inputs from yawing the aircraft off the desired track). Thus, if you are trying to maintain the extended centreline of a runway on approach (right foot pushed to the floor) and the aircraft begins to migrate to the right of the centreline (in the direction of the yaw), simply increase the opposite bank to move the aircraft back to the centreline. The control of tracking, in this respect, is not complicated at all. The only special concern that you must keep in mind is that you must not raise the nose of the aircraft. As a rule, when the aircraft is slipped, the airspeed becomes potentially misleading, as the pitot-static pressure is affected by the slip. While this error is minimal in the Piper Cherokee, it is quite drastic in Cessna and other aircraft equipped with an L-shaped pitot tube.1 If the aircraft were to inadvertently stall, note that spin inputs are all in place and ready to go (rudder pedal depressed, and ailerons deflected).
With a slipping turn, it is crucial that you always use “top” or “outside” rudder. If you do a slipping left turn, the higher right rudder must be used; if you do a slipping right turn, the higher left rudder must be used. There is no option here. The risk is that “inside” or “bottom” rudder will, if the aircraft stalls, snap the aircraft into a spin.2 If outside rudder is used, and the aircraft were to stall, the pilot would have a lot more time to use counter-spin measures and arrest the descending wing.
Side slipping, as used for crosswind correction, is quite different. To begin a sideslip in actual crosswind condition, begin the final approach by allowing the aircraft to “crab” into the wind—the long axis pointed upwind, but the track of the aircraft stays on the centreline. As the aircraft approaches short-final (halfway between the turn from base to final approach and the runway threshold, depress the pedal that will swing the long axis to line-up with the runway centreline. If nothing else is done, the aircraft will of course begin to drift downwind and off the centreline, so to counter this drift, you must begin to bank into the wind. Like forward slips, the amount of bank that you input will control the aircraft’s position relative to the centreline. If the aircraft begins to drift off the centreline toward the wind side, you have too much bank inputted, and you must decrease this accordingly. If you drift off the centreline toward the down wind side, you have too little bank, and must increase this accordingly. Thus, through the ailerons, you are controlling the placement of the aircraft on the centreline though the use of bank. What about the feet, you ask? The feet simply keep up with the bank inputs, always striving to keep the aircraft’s long axis aligned with the projected runway centreline.
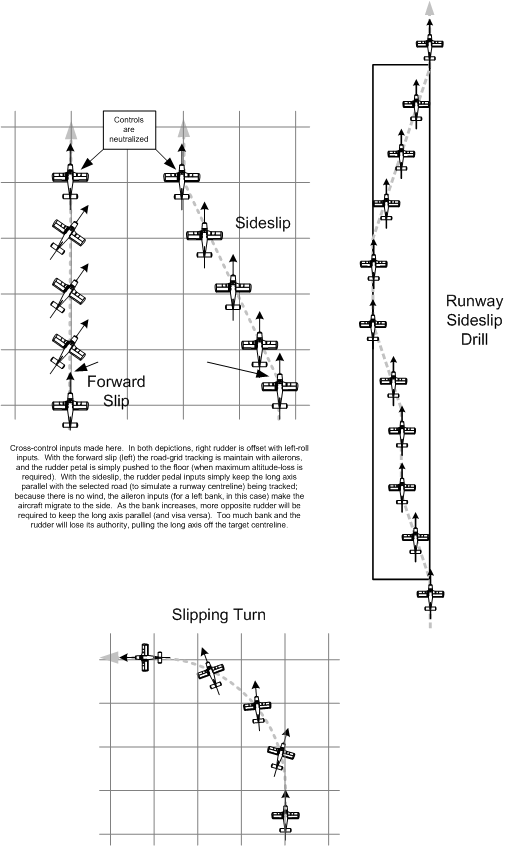
An exercise commonly used by Instructors is depicted above. The exercise is conducted while that aircraft flies down the full-length of a long runway (usually at Pitt Meadows or Abbotsford Airports). The aircraft is aligned with an edge of the runway. After the aircraft is stabilized for a few seconds safely above the runway edge, the pilot banks toward the runway centreline, so that the aircraft migrates toward the runway centreline. During this movement, the pilot must keep the long axis parallel with the runway. When the aircraft reaches the runway centreline, the controls are neutralized and the aircraft tracks the centreline for a few seconds. Then the pilot banks towards the far runway edge; again, the feet keep the long axis parallel to the centreline. The aircraft is stabilized over this runway edge for a few seconds, before the movement is repeated in the opposite direction.
Flight Safety
- Because slipping practise involves considerable altitude loss, always ensure that you have checked for vicinity traffic before you begin the descent.
- Be conscious not to increase the angle of attack of the aircraft while holding slip inputs. Be aware of the fact that slipping inputs are the same as spin inputs, and the aircraft is, essentially, loaded for a spin entry. Conversely, don’t develop the habit of relying on the airspeed indicator during a slip—instead, control the angle of attack directly—i.e., the angle between the nose of the aircraft and the horizon.
- Never use inside or bottom rudder during a slipping turn. If the aircraft were to inadvertently stall, spin autorotation toward the inside of a turn (combined with inside rudder) is far more adverse than autorotation toward the outside of a turn (combined with outside rudder).
References
1 In these types of aircraft, the static source for the pitot/static system is likely placed on the fuselage of the aircraft; when yaw is input, static pressure either increases or decreases with the yaw, causing erroneous flight instrument indications.
2 Because of the dangers of using inside rudder during a turn, this practice will likely produce an automatic failure on a flight test.