.jpg)


STALL
The flight test requires that Private Pilot Students perform two stalls, and Commercial Pilot Students perform one stall. For Private Pilot Students, the first stall is a power-off entry, and the second stall is a power-on entry . For Commercial Pilot Students, the stall shall be entered from a practical flight situation.
Power-off Stall (Private Pilot Students)
Aim
Students must demonstrate that they can recognize indications of the approach to arrival stalls (power-off), the full stall, and demonstrate the skill to accomplish a positive and smooth recovery with a minimum loss of altitude .
Description
You must demonstrate this stall at an operationally safe altitude that allows recovery at or above the attitude recommended by the manufacturer or 2000’ AGL, whichever is higher. The stall will be entered from a power-off configuration as specified by the Examiner.
Performance Criteria
Private Pilot Students must:
- complete appropriate safety precautions before entering a stall;
- establish the configuration and power setting as specified by the examiner;
- transition smoothly to a pitch attitude that will induce a stall;
- recognize the onset of the stall by identifying the first aerodynamic buffeting or decay of control effectiveness;
- stall the aeroplane;
- maintain directional control;
- promptly and smoothly recover using control applications in the proper sequence;
- avoid a secondary stall and excessive airspeed or altitude loss.
Power-on Stall (Private Pilot Students)
Aim
Private Pilot Students must demonstrate that they can recognize indications of the approach to a departure or overshoot (power-on) stalls, the full stall, and demonstrate the skill to accomplish a positive and smooth recovery with a minimum loss of altitude.
Description
You must demonstrate this stall at an operationally safe altitude that allows recovery at or above the altitude recommended by the manufacturer or 2000’ AGL, whichever is higher. The stall will be entered from a power-on situation, with the configuration of the aircraft specified by the Examiner
Performance Criteria
Private Pilot Students must:
- complete appropriate safety precautions before entering a stall;
- establish the configuration and power setting as specified by the examiner;
- transition smoothly to a pitch attitude that will induce a stall;
- recognize the onset of the stall by identifying the first aerodynamic buffeting or decay of control effectiveness;
- stall the aeroplane;
- maintain directional control;
- promptly and smoothly recover using control applications in the proper sequence;
- avoid a secondary stall and excessive airspeed or altitude loss.
Practical Stall (Commercial Pilot Students)
Aim
Commercial Pilot Students must demonstrate that they can recognize indication of the approach to either departure or arrival stalls, the full stall, and demonstrate the ability to accomplish a positive and smooth recovery with a minimum loss of altitude.
Description
You must demonstrate this stall at an operationally safe altitude that allows recovery at or above the altitude recommended by the manufacturer or 2000’ AGL, whichever is higher. The stall will be entered from practical flight situations, such as slow flight, simulated overshoot, or a climbing or descending turn. The configuration of the aircraft specified by the Examiner.
Performance Criteria
Commercial Pilot Students must:
- complete appropriate safety precautions before entering a stall;
- establish the configuration and power as specified by the examiner;
- transition smoothly to a pitch attitude that will induce a stall;
- recognize the onset of the stall by identifying the first aerodynamic buffeting or decay of control effectiveness;
- stall the aeroplane;
- maintain directional control;
- promptly and smoothly recover using control applications in the proper sequence;
- retract flaps to the recommended setting and retract landing gear (where applicable) after a positive rate of climb is established, or as recommended by the manufacturer;
- accelerate to at least Vx or the speed recommended by the manufacturer, whichever is higher, before a final flap retraction;
- avoid secondary stall, excessive airspeed or excessive altitude loss;
- return to the altitude, heading and airspeed specified by the examiner.

Discussion
Your Instructor will introduce you to a variety of stalls, beginning with basic stalls, and progressing to more advanced stall configuration that are more demanding on pilot skill. The complexity of a stall varies with the power setting, flap setting, and the aircraft bank angle, if any, during the stall entry phase. The basic stall variations, based on the use of power during the entry and recovery phases, are listed below. Students normally begin by learning to entry and recovery from a stall without using
power as the primary simptoms of stall—in sequence, pre-stall warning system (light or horn), the onset of stall buffet, and finally the nose-drop—are more discernable with the power set at idle. Instructors will typically first spend time with you transitioning in and out of stall so that you become familiar with stall symptoms and recognition of their onset. Power-off stalls with power-off recoveries are normally first accomplished by slowly increasing the angle of attack during a gentle glide. With the appearance of stall symptoms, emphasis will be placed on your discontinuation of roll inputs on the control column—you have to neutrallize roll inputs by holding or checking the the column in the level position—as the risk of stall becomes evident. With this, your control of the aircraft's angle of bank will transfer to your feet through the use of gentle but firm rudder inputs. Sometimes your job will be simply be to maintain the wings level during the stall sequence, while during advance stall you will be trained to maintain an angle of bank (usually gentle) assigned by your Instructor.
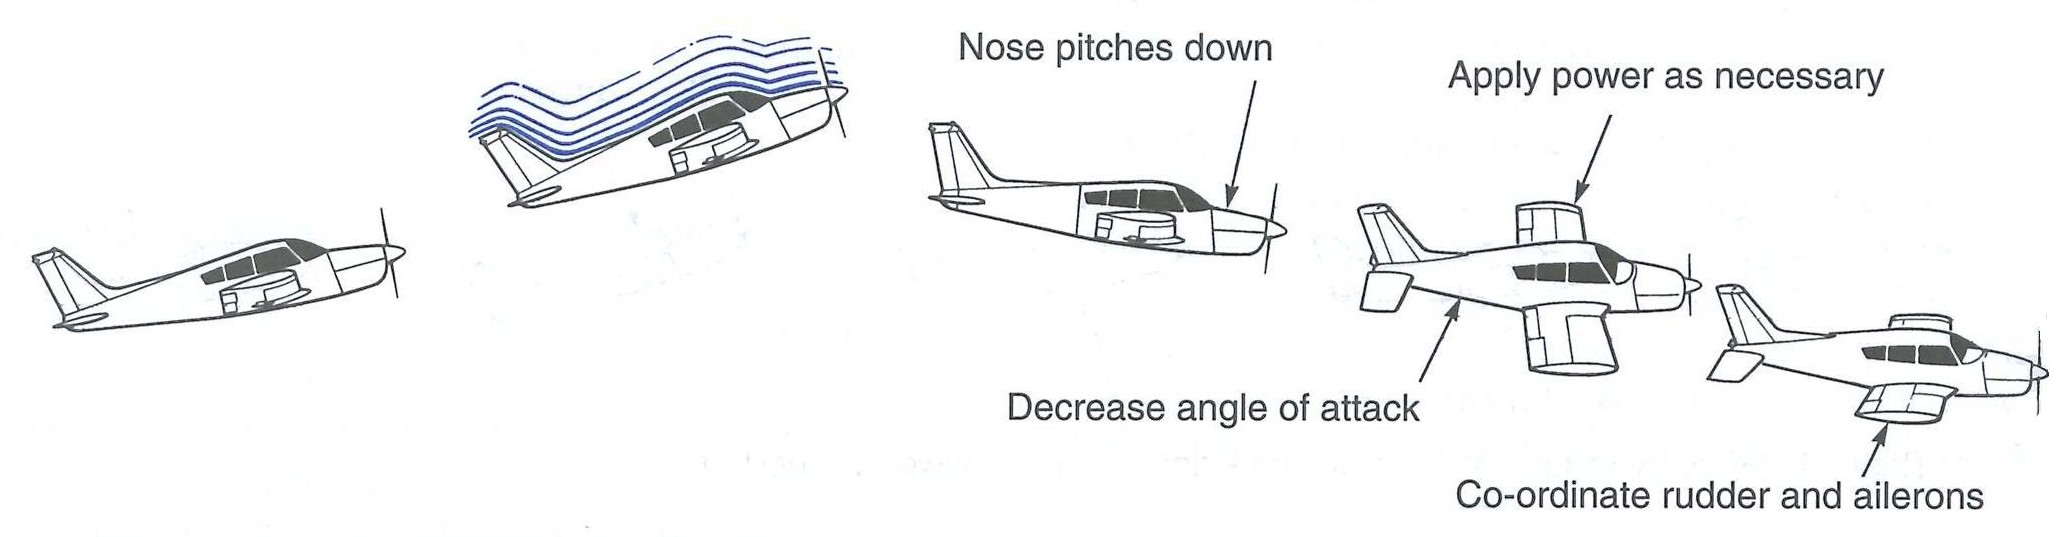
The most important lesson from this sequence of stall exercises is that the aircraft will stall at any speed and in any attitude—in all cases, a stall occurs when the critical angle of attack—usually 18°--is exceeded. The job of the pilot during the recovery is therefore quite simple: smoothly and steadily decrease the angle of attack with controlled, smooth, and steady, forward motion of the control column. Never snap or jerk the control column forward as this simply confuses the aircraft and excites your Instructor. Don't be a jerk! Always be slow, purposeful and smooth during your inputs to pitch the nose forward to decrease the angle of attack. Equally important, never give up excess pitch to a stall--the pitching forward or pushing forward of the control column should only progress to the point that the stall symptoms recede and disappear. This is important because we want to be effective in recovering from a stall in close proximity to the ground.
There are also some crucial considerations concerning the use of power during stall events that you must be aware of. It is pretty clear that the use of power during the recovery will quicken the return to normal flight (unstalled condition); remember, though, that the aircraft is barely at flying speed after the nose has been lower from the critical angle of attack, so power changes, like recovery pitch inputs, must be smooth and purposeful, and slow enough for your feet to keep pace with the inevitible adverse yaw associated with large power changes at very low speeds.
But there is even a more critical consideration related to use of power during stall events and this relates to flight conditions where the stall is entered with the power on—when the power is on when the stall is entered, the airflow over the stabilator or elevator will create an artificial nose-up attitude and thereby conceal the final stall symptom, which—of course—is the nose drop. In a power-on stall, the nose may not drop! It will simply hang up while in fact the aircraft is clearly stalled and is losing altitude and suffering from control loss associated with normal stall.
The power-on stall with power-on recovery is also the most complex of the stall variations as the aircraft is more likely to drop a wing, creating far greater demands on the pilot's skill at keeping the wing level and under control with the use of rudder.
A HASEL check must be conducted before the manoeuvre. After completing the lookout, line up the aircraft with a prominent landmark (preferably “the grid”—the east-west avenues or north-south streets). Remember not to delay between the lookout and the entry into the stall.
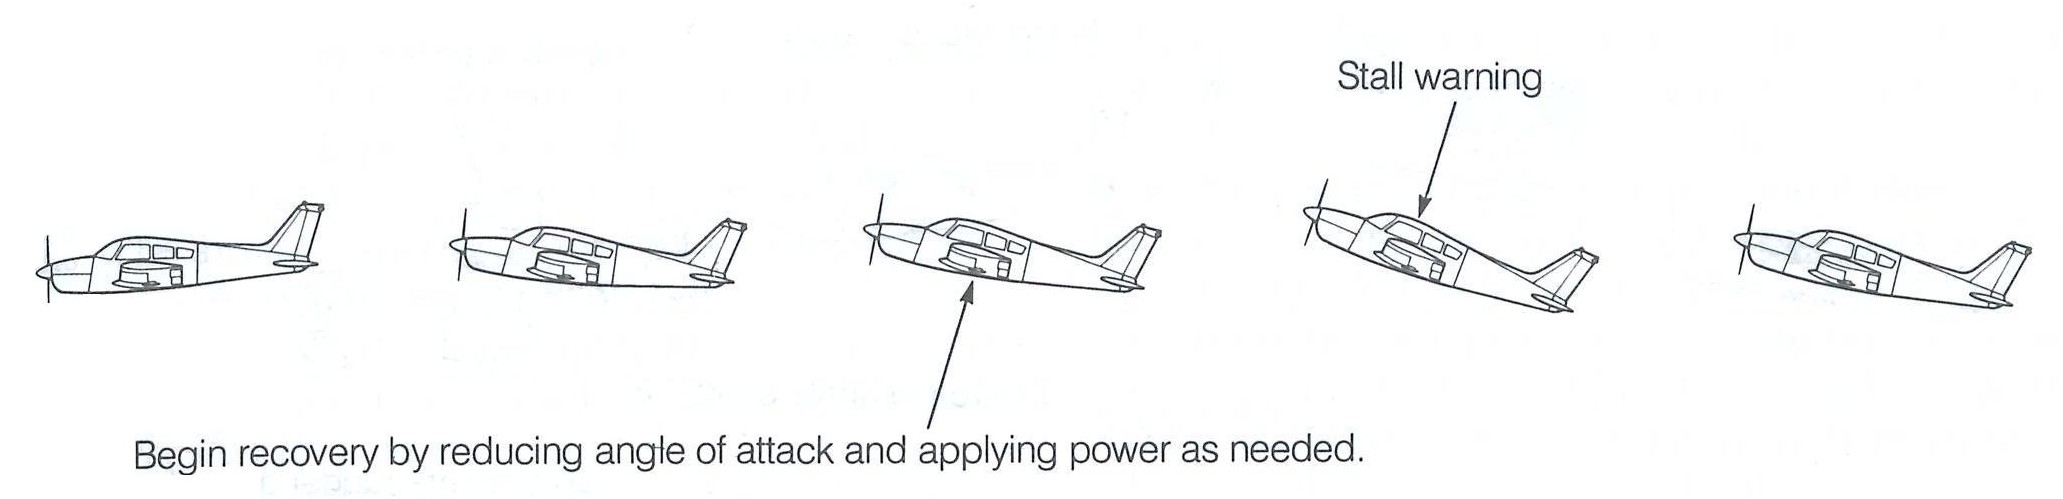
With respect to power-off entry stalls, begin the manoeuvre by slowly reducing the power—as the power is reduced, you will have to concentrate on smoothly controlling both pitch (the nose will want to go down) and yaw (the aircraft will want to yaw to the right—opposite to when you apply takeoff power). The ideal performance is to smoothly adjust pitch so as to maintain level altitude; this should been smoothly and slowly in response to keeping the the the altimeter steady on the altitutude target. As power is reduces and pitch increased, smoothly apply rudder to keep the wings level or in the desired angle of bank —the smoother you are with the power reduction, the easier it will be to control yaw and pitch. As you approach the stall, the three primary symptoms will occur in succession—the stall warning system will trigger (light or horn), then the buffet caused by turbulent flow will felt and heard, and finally the nose will drop. Remember, with the onset of stall symptoms, you should concentrate on neutralizing aileron inputs—plant your elbow on the elbow rest and this will hopefully remind you.1
The importance of directional control during a stall warrants special consideration. As the power is reduced for the entry, the aircraft will yaw right; it is therefore important to offset this yaw with smooth left rudder. To do this effectively, you must have a prominent landmark as reference for keeping the aircraft straight. If you try to correct direction too late—after a stall has occurred—you will invite a wing drop, so get the right rudder in before the stall occurs. After the stall is occurring (from the buffet through to the nose drop), your attention is best focused on simply keeping the wings level—at this point, keeping straight is secondary.
With respect to a power-off stall using a power-on recovery, you should initiate the manoeuvre using sufficient back-pressure on the control column (after power is smoothly reduced to idle) to maintain altitude—this should be smooth throughout, but as the stall approaches you will usually have to increase the rate at which you pull back the column (remember the ailerons are neutral). When the nose drops despite the back-pressure, the stall is achieved; you should then smoothly decrease the angle of attack with forward stick pressure until the buffet stops,2 and full power should be smoothly but aggressively applied. As soon as you have lowered the nose, the stall is usually broken and it is fair game to begin using the ailerons again to keep the wings level. With the application of throttle, and the lowering of the nose, remember to use your feet aggressively to keep the nose straight (the application of power will of course cause a left-yaw tendency). Remember that the name of the game is “minimal altitude loss” so avoid pushing the nose forward (downward) any more than it is necessary to stop the stall buffet.
The power-off stall with a power-off recovery is the most basic form of a stall, designed to prepare pilots for a stall occurring during a departure climb when the engine has failed (and power now cannot be used as a recovery tool). The stall entry is the same as above, but the forward or downward pitch required for the recovery will be greater than in the case for the power-on recovery. Nevertheless, be sure that you do not pitch down excessively here—the rule still applies with respect to minimal pitch to exit from the critical angle of attack back to a safe angle of attack.
With a power-on stall, the idea is to expose yourself and the aircraft to the higher angles of attack usually associated with a power-on stall for as little time as possible (quite simply stated, the longer you hold the nose up with the power on, the more likely you are to develop the incipient spin feature of a wing drop). After completing the required checks, set the power as required, keeping the aircraft straight and level. After the speed slows to about Vsl + 15, progressively but smoothly raise the nose to an approximate angle of 30° above the horizon—then hold it there with appropriately increasing back-pressure, not allowing the nose to rise or fall until the stall is achieved. Then, when the nose falls despite backpressure, lower the nose sufficiently to break the stall with, of course, full power. Again, pitch forward only to the extent that is required to unstall the aircraft and exit from the critical angle of attack (that is, stop the stall buffet). The rudder work stays the same as with a power-off stall, but you will have to be more aggressive as there will be more left yaw tendencies to control as you raise the nose, and there will be a tendency for wings to fall faster. In keeping the wings level, however, smoothness in your inputs is the key, as this will reduce the need for jerky rudder work.
In addition, you Instructor will introduce you to stalls during turns, with and without flaps. With turning stalls, and stalls using extended flaps, the inputs are surprisingly normal. The steeper the turn used for the stall entry, the more adverse will be the stall (make it easy on yourself and limit the angle of bank to 30° or less). With stalls in a flap configuration, the procedure for recovery is the same as with a no-flap stall, except that you retract the flaps after you have recovered and placed the aircraft in a climbing attitude. Remember most of all that, despite the type of stall you perform, the name of the game is a minimal loss of altitude.
Flight Safety
- Because of altitude loss, a HASEL check must be carefully performed: Height, Area, Security, Engine, and Lookout. Altitude should be high enough to recover from the stall 2000’ above ground minimum, or the minimum recovery altitude prescribed by the Pilot Operating Handbook. In the case of the PA-28-140, the 2000’ rule applies. Is the fire extinguisher secured? How about your passenger and articles in the aircraft? Remember that a person coming out of his or her harness could be deadly if they end up on top of the controls—with the potential danger here in mind, physically tug on your seatbelt and the seatbelt of your passenger.3
- The dropping of a wing can cause an inadvertent spin entry,4 at which time rudder must be used to arrest this movement (ailerons during a spin are not only useless, but they can complicate the autorotation), the nose must be lowered to a recovery airspeed and decrease the angle of attack from the critical angle, and the ailerons must be maintained neutral.
- Effort should be made to avoid lowering the nose to an excessively steep angle; this would produce both excessive speed and altitude loss during the recovery and resultant G-force exerted on the airframe.5
Further Readings
Transport Canada's Stall/Spin Training
References
1 The failure of examination candidates to maintain neutral aileron at or near stall speed is a classic error performed on a flight test—it is considered a “major” and Examiners are looking for it—and it is a habit you best establish early in your flying. The danger associated with aileron use at the stall is the risk of creating a “differential” stall where the wings are stalled differently—here you are just inviting one wing to stall, and with this a spin has begun.
2 An important message here is that you must remember that all of our training occurs in the utility category where the centre of gravity is forward. In a normal flight, however, with normal category loading (associated with a rearward centre of gravity), anticipate that far more aggressive and dramatic forward pressure on the control column will be required to exit the stalled condition—unfortunately, we cannot demonstrate this in flight training as it would be too dangerous, but at least we can make you aware of this hazard.
3 A member of the Snowbirds was killed while performing in Toronto when he suddenly lost control his Tutor aircraft; the accident investigation concluded that the pilot came out of his harness and ended up on the control stick. It is easy to conceive of a “g” force that would “peg” you against the control column making it impossible for you to recover. To politely check the security of your passenger’s seatbelt, tug on the belt just above where it is bolted to the floorboards.
4 A skilled pilot requires less than 100’ to recover from a stall; but the same pilot requires 700’ to recover from a 1-rotation spin—altitude that might not always be available.
5 Non-aerobatic aircraft are physically strong with respect to positive “g” forces, but their backs can be easily broken by negative “g” forces—the risk of a negative g-force occurs here in a rapid pitch-down movement (identified to the pilot when strained against the harness).